1. LCD操作原理
- 驱动程序:Farmebuffer驱动程序设置好LCD控制器:
- 根据 LCD 的参数设置 LCD 控制器的时序、信号极性;
- 根据 LCD 分辨率、BPP(Bit Per Pixel)分配 Framebuffer。
- 应用程序:使用 ioctl 获得 LCD 分辨率、BPP;通过 mmap 映射 Framebuffer,在 Framebuffer 中写入数据
- LCD控制器周而复始的从内存中取出LCD屏幕上每一个像素点的显示数据
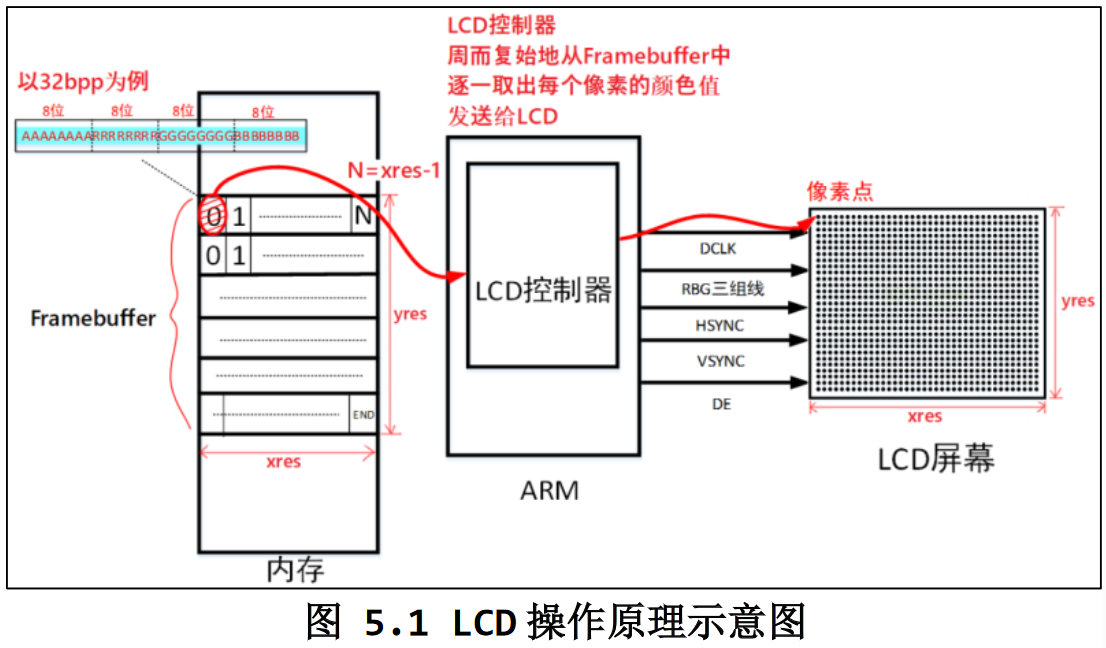
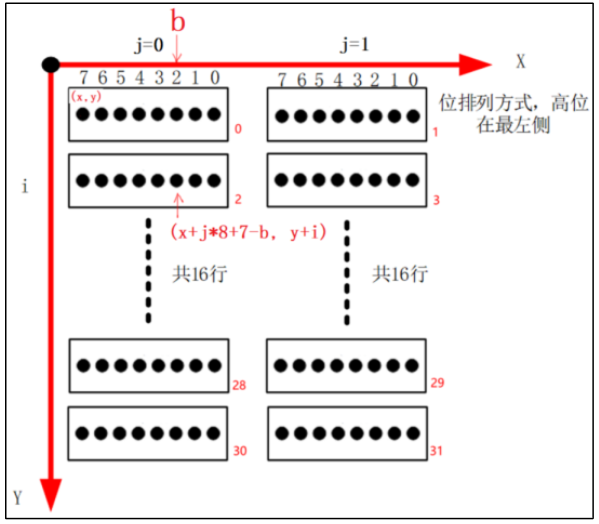
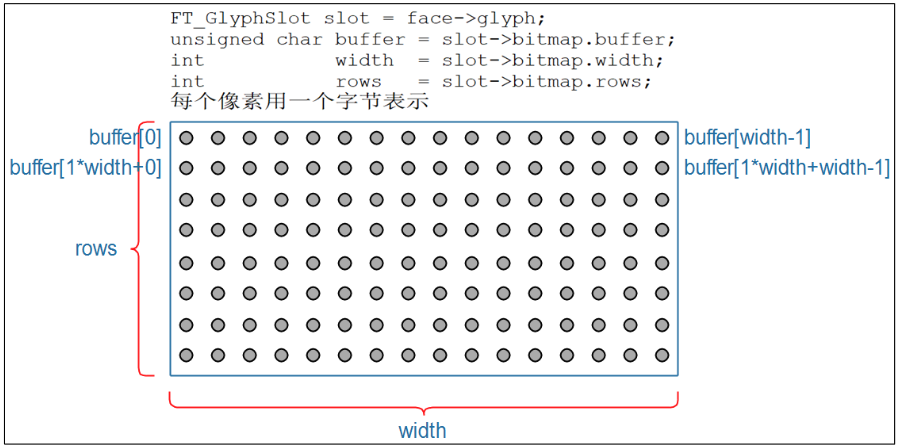
计算(x,y)坐标处像素对应Framebuffer地址:
1 | (x,y)像素起始地址 = fb_base + (xres * bpp / 8) * y + x * bpp / 8 |
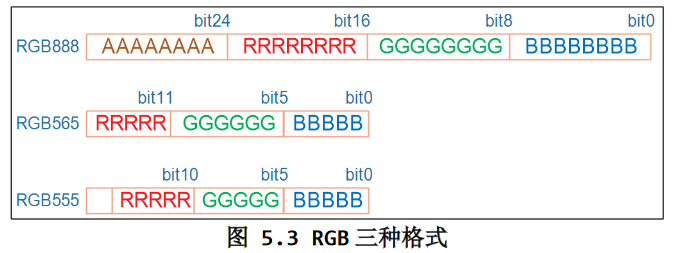
1.1 像素RGB显示格式
- 32BPP:一般只设置其中的低 24 位,高 8 位表示透明度,一般的 LCD 都不支持。
- 24BPP“硬件上为了方便处理,在 Framebuffer 中也是用 32 位来表 示,效果跟 32BPP 是一样的。
- 16BPP:常用的是 RGB565;很少的场合会用到 RGB555
1.2 LCD设置
实验过程中LCD过几分钟就黑屏,可以关闭黑屏的功能,执行以下命令即可:
1 | echo -e "\033[9;0]" > /dev/tty0 |
移除LCD自带的GUI,执行以下命令之后重启:
1 | mv /etc/init.d/S99myirhmi2 /root |
2.编写LCD应用程序
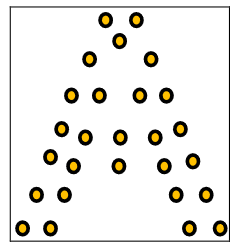
在LCD屏幕上显示点
1 |
|
3.文字显示
3.1 常用编码方式介绍
3.1.1 ANSI
- ANSI 是 ASCII 的扩展,对于 ASCII 字符仍以一个字节来表示,对于非 ASCII 字符则使用 2 字节来表示
- ANSI 编码,它跟 “本地化”(locale)密切相关。比如在大陆地区,ANSI 的默认编码是 GB2312; 在港澳台地区默认编码是 BIG5
- 例如GB2312编码的
A中对应十六进制为41 D6 D0。41的最高位是0,则是单字节的ASCII码,D6的最高位是1,则D6是一个双字节字符的高字节,然后在GB2312的编码表中在进行查找 - 这样的方式,导致同一个字符对应不同的编码,同一文件在不同地区打开时可能会乱码
3.1.2 Unicode
Unicode编码对于地球上任意一个字符,都会给它一个唯一的数值
Unicode中的数值范围是 0x0000 至 0x10FFFF
Unicode 的三种实现方式:UTF-16le(小字节序)、UTF-16be(大字节序)、UTF-8(可变长编码)对于“A中”的编码如下:
1
2
3
4FF FE 41 00 2D 4E //UTF-16le
FE FF 00 41 4E 2D //UTF-16be
EF BB BF 41 E4 B8 A0 //UTF-8
41 D6 D0 //ANSIUTF-16le 的 BOM 为
FF FE,UTF-16be 的 BOM 为FE FF,UTF-8 的 BOM 为EF BB BF,ANSI 没有头部BOM
3.1.3 Unicode的编码实现-UTF8
UTF8的BOM为:
ef bb bf为了对于常用字符用尽可能少的字节进行表示,同时又能表示出所有的字符,UTF8采用了一种可变字节的方式来表示所有字符的Unicode编码
对于 ASCII 字符,在 UTF8 文件中直接用其 ASCII 码来表示
- 对于一个字节,如果第一位为0,则为ASCII码,并且独立的表示一个字符
对于非 ASCII 字符,使用变长的编码,一个字符的高字节的高位自带长度信息:
- 对于两字节字符:高字节的高位为:
110 - 对于三字节字符:高字节的高位为:
1110 - 对于四字节字符:高字节的高位为:
11110 - 对于以上这些多字节的字符的其他字节,高位为:
10
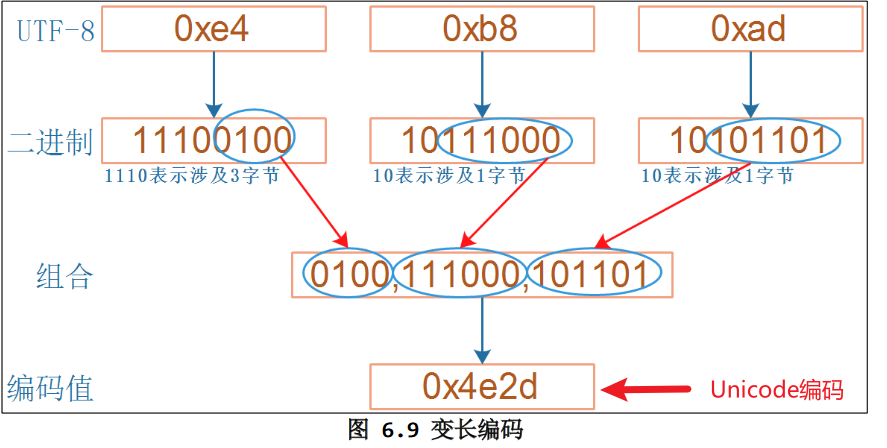
- 对于两字节字符:高字节的高位为:
UTF-8节省空间,扩展性好,丢失部分数据不会影响其他数据的正常显示
求一个 UTF-8 字符的 Unicode 编码:
1
2
3
4
5
6
7
8
9
10
11
12
13
14
15
16
17
18
19
20
21
22
23
24
25
26
27
28
29
30
31
32
33
34
35
36
37static int Utf8GetCodeFrmBuf(unsigned char *pucBufStart, unsigned char *pucBufEnd, unsigned int *pdwCode)
{
int i;
int iNum;
unsigned char ucVal;
unsigned int dwSum = 0;
if (pucBufStart >= pucBufEnd)
return 0;
ucVal = pucBufStart[0];
// 求该字节中前导1的个数
iNum = GetPreOneBits(pucBufStart[0]);
if ((pucBufStart + iNum) > pucBufEnd)
return 0;
if (iNum == 0)
{
*pdwCode = pucBufStart[0];
return 1;
}
else
{
ucVal = ucVal << iNum;
ucVal = ucVal >> iNum;
dwSum += ucVal;
for (i = 1; i < iNum; i++)
{
ucVal = pucBufStart[i] & 0x3f;
dwSum = dwSum << 6;
dwSum += ucVal;
}
*pdwCode = dwSum;
return iNum;
}
}
3.2 显示英文点阵字符
在 Linux 内核源码中有这个文件:lib\fonts\font_8x16.c:
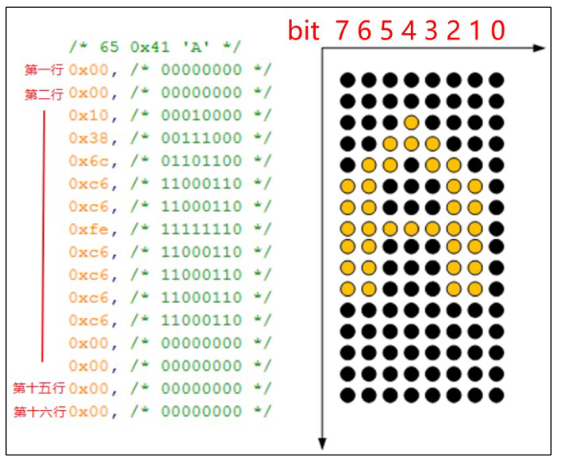
对应的显示函数:
1 | void lcd_put_ascii(int x, int y, unsigned char c) |
3.3 显示中文点阵字符
3.3.1 指定代码文件的编码格式
代码文件中包含非ASCLL码的字符时,尤其要注意文件的编码格式
在编译程序时使用以下选项告诉编译器代码文件的编码格式;如果不指定,则编译器会默认代码文件的编码格式为UTF-8:
1
2
-finput-charset=GB2312
-finput-charset=UTF-8在编译程序时使用以下选项指定可执行程序里的字符的编码格式;:
1
2
-fexec-charset=GB2312
-fexec-charset=UTF-8
如果-finput-charset和-fexec-charset不一样,则编译器会执行格式转换
3.3.2 汉字区位码
HZK16是常用汉字的16×16点阵字库,使用GB2312编码值来查找点阵。
以”中”字为例,它的编码值是0xd6 0xd0,其中的0xd6 表示区码,表示在哪一个区:第0xd6-0xa1 区;其中的0xd0表示位码,表示它是这个区里的哪一个字符:第0xd0-0xa1个。每一个区有 94 个汉字。区位码从0xa1 而不是从 0 开始,是为了兼容 ASCII 码。所以”中”对应HZK16中(0xd6 - 0xa1) * 94 + (0xd0 - 0xa1)位置的字符。
对应显示函数:
1 | void lcd_put_chinese(int x, int y, unsigned char *str) |
4.使用FreeType
FreeType库是开源的高质量字体引擎;支持多种字体格式文件,并提供了统一的访问接口;
可以在官网下载到FreeType库,包括文档和示例代码
4.1 矢量字体
使用点阵字库显示字符时,大小固定,如果缩放的话字体显示效果会比较差,而矢量字体能够很好解决这个问题。矢量字体的形成分为三步:
确定关键点(glyph)
使用贝塞尔曲线连接头键点
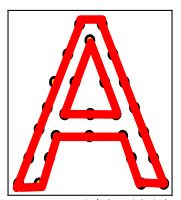
填充闭合曲线内部空间

对于矢量字体进行缩放,关键点的相对位置不变,只要用数学曲线平滑,字体就不会变形。
4.2 使用FreeType显示矢量字体
矢量字体文件中记录不同字符的关键点(glyph);Windows使用的字体文件在C:\Windows\Fonts目录下,拓展名为.TTF都是矢量字库。
和点阵字库一样,矢量字库也是通过字符编码来寻址,从而找到对应的字体关键点。Charmaps表示矢量字库的字符映射表,可能支持多种编码进行寻址,例如ASCII、GB2312、UniCode,一般矢量字库都支持UniCode编码。
4.2.1 步骤概括
- 获取字符UniCode编码值
- 设置字体大小
- 根据编码从Charmaps中找到对应的关键点,FreeType库会根据字体大小自动调整关键点位置
- 把关键点转换为点阵位图
- 在LCD上进行显示
参考FreeType库官网的使用文档,可以总结使用FreeType库的调库步骤:
- 初始化:
FT_InitFreeType - 加载字体文件Face:
FT_New_Face - 设置字体大小:
FT_Set_Char_Sizes或FT_Set_Pixel_Sizes - 选择Charmap:
FT_Select_Charmap - 根据字符编码charcode得到字符位图:
FT_Load_Char(face, charcode, FT_LOAD_RENDER)- 根据编码值Charcode找到glyph_index:
glyph_index = FT_Get_Char_Index(face, charcode) - 根据glypg_index取出glyph:
FT_Load_Glyph(face, glyph_index) - 转换为点阵位图:
FT_Render_Glyph
- 根据编码值Charcode找到glyph_index:
- 移动或者旋转:
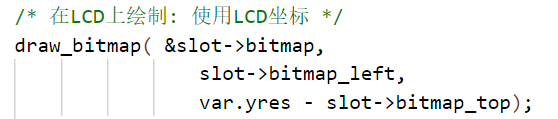
FT_Set_Transform - 调用LCD显示函数将位图进行显示
4.2.2 FreeType的几个重要结构体
FT_Library
对于 freetype 库,使用 freetype 之前要先调用以下代码进行初始化:
1 | FT_Library library; /* 对应 freetype 库 */ |
FT_face
对应矢量字体文件,使用如下代码来打开一个字体文件
1 | error = FT_New_Face(library, font_file, 0, &face ); /* 加载字体文件 */ |
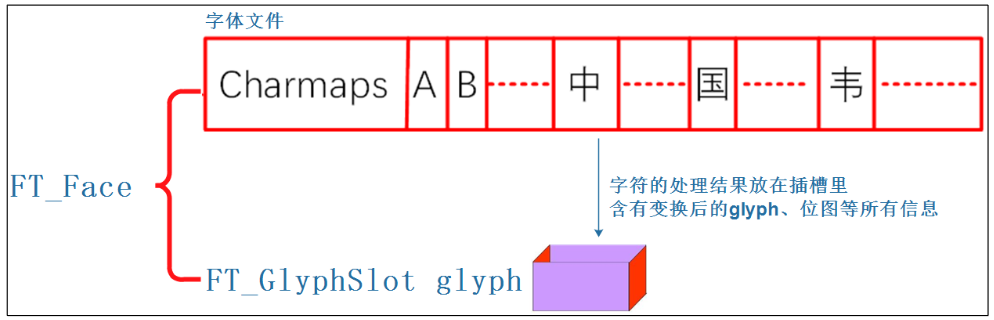
FT_GlyphSlot
插槽,用来保存字符的处理结果(比如glyph,位图等信息)。当处理face字库中下一个字符时,会覆盖掉插槽中保存的上一个字符的内容。
1 | FT_GlyphSlot slot = face->glyph; /* 插槽: 字体的处理结果保存在这里 */ |
FT_Glyph
字符的原始关键点信息,使用 freetype 的函数可以放大、 缩小、旋转,这些新的关键点保存在插槽中
1 | FT_Glyph glyph; |
FT_BBox
表示一个字符的外框,即新 glyph 的外框:
1 | typedef struct FT_BBox_ |
4.2.3 在LCD上显示矢量字体
使用wchar_t获取字符的UniCode值
wchar_t是宽字符类型,根据系统可能大小是2字节或者4字节。使用宽字符保存的字符编码格式为UTF-16或者UTF-32都属于Unicode编码家族。不同于UTF-8,这两种编码对于每一个字符都是用相同的字节保存,所以宽字符中保存的就是该字符对应的原始Unicode编码
1 |
|
在我的系统上输出:
1 | sizeof(wchar_t) = 4, str's Uniocde: |
代码
1 | wchar_t *chinese_str = L"繁"; |
绘制位图,位图中的每一个像素使用一字节表示:
1 | void draw_bitmap(FT_Bitmap *bitmap, FT_Int x, FT_Int y) { |
4.2.4 字体的平移和旋转
1 | FT_Vector pen; |
4.3 使用FreeType显示一行文字
4.3.1 坐标系转换
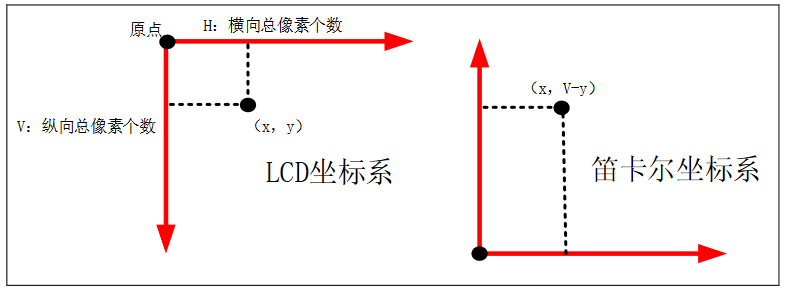
FreeType使用的坐标系是笛卡尔坐标系,和LCD使用的坐标系之间需要进行转换:
4.3.2 使用矢量字体显示一行文字的过程
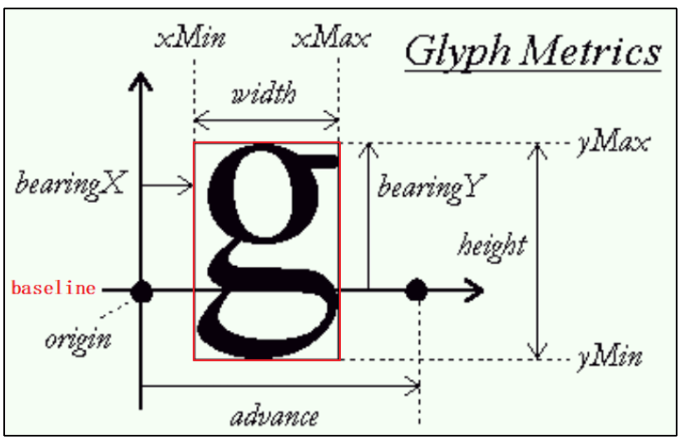
如果需要在给定坐标处作为左上角显示一行文字;使用点阵字体显示时,每个字符大小已知且相等,可以直接在指定位置上显示字符;
但是使用矢量字体:
由于每一个字符的大小和位置都不同,必须遍历一行文字,求出这行文字最小外接矩形的笛卡尔坐标

假设给定坐标的笛卡尔坐标为
,最小外接矩形的左上角坐标为 ,则坐标 为平移之后第一个字符显示的原点(origin) 
知道第一个字符的原点,可以通过
FT_Set_Transform(face, 0, &pen);设置平移向量;设置完所有矢量字体的参数之后,将第一个字符的左上角坐标转换为LCD坐标,即可显示第一个字符的位图
然后由第一个字符的步进量
advance得到下一个字符的origin,即可重复上面的过程
矢量字符大小示意图:
4.3.3 代码
求最小外接矩形
1 | int compute_string_bbox(FT_Face face, wchar_t *wstr, FT_BBox *abbox) { |
显示一行文字
1 | /* 计算外框 */ |