1. 电阻屏和电容屏定位原理
1.1 电阻屏
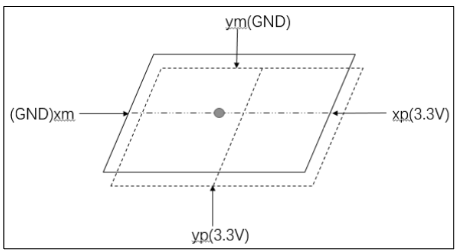
- 根据分压原理,计算电阻值。假设材料长度和电阻成线性关系,则可以计算出相对距离
- 电阻屏分为上下两层薄膜,一层通电时,另一层在按压时作为探针获取分压值,从而进行计算
- 电阻屏和LCD使用之前,需要进行五点校准二者的相对位置
1.1.1 电阻屏数据
按下时:
1 | EV_KEY BTN_TOUCH 1 /* 按下 */ |
松开时:
1 | EV_KEY BTN_TOUCH 0 /* 松开 */ |
1.2 电容屏
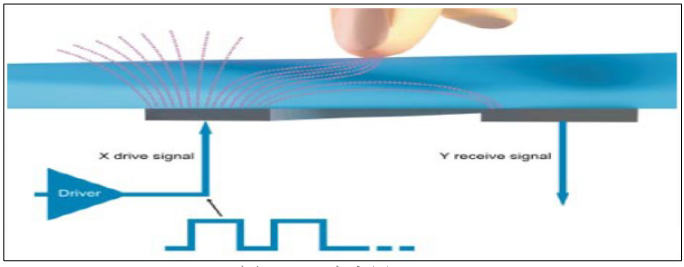
电容屏中有一个控制芯片,它会周期性产生驱动信号,接收电极接收到信号, 并可测量电荷大小。当电容屏被按下时,相当于引入了新的电容,从而影响了接 收电极接收到的电荷大小。主控芯片根据电荷大小即可计算出触点位置,应用开发人员只需要编写程序,通过 I2C 读取芯片寄存器即可得到这些数据。
1.2.1 电容屏多点触摸上报数据
1 | EV_ABS ABS_MT_SLOT 0 // 这表示“我要上报一个触点信息了”,用来分隔触点信息 |
当 ID 为 45 的触点正在移动时:
1 | EV_ABS ABS_MT_SLOT 0 // 表示“要上报一个触点信息了”,之前上报过ID,就不用再上报ID |
松开 ID 为 45 的触点时(在前面 slot 已经被设置为 0,这里不需要再重新设置 slot,slot 就像一个全局变量一样:如果它没变化的话,就无需再次设置):
1 | EV_ABS ABS_MT_TRACKING_ID -1 // slot对应的ID是45,这里ID=-1,表示ID=45的触点被松开了 |
最后,松开 ID 为 46 的触点:
1 | EV_ABS ABS_MT_SLOT 1 // 这表示“我要上报一个触点信息了”, slot 1 的 ID 为 46 |
1.2.2 电容屏实际数据分析
电容屏单点击:
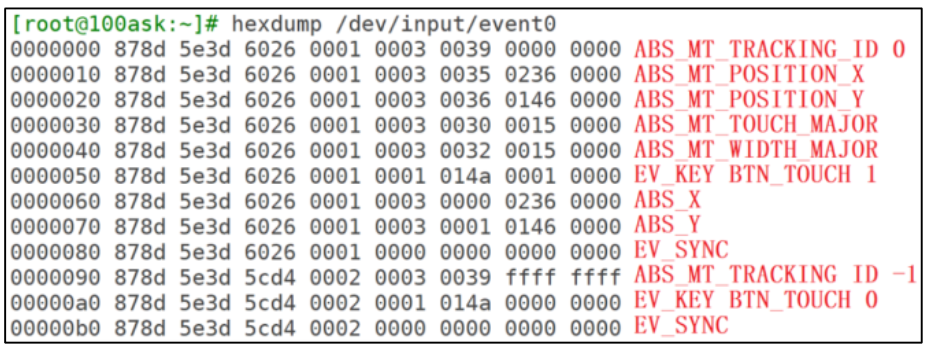
xx_MAJOR:用来描述触点大小,不是常用数据ABS_X/ABS_Y:用来兼容老版本应用程序,电阻屏就是使用这个类型的数据
两点触发:
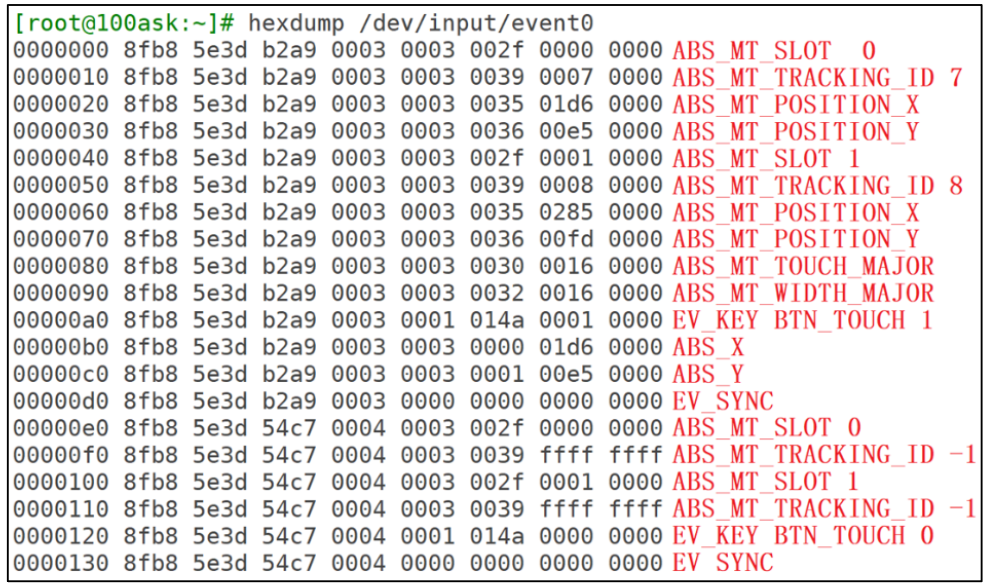
- 为了兼容老程序,它也上报了 ABS_X、ABS_Y 数据,但是只上报第 1 个触点的数据
2.触摸屏开源库-tslib
2.1 tslib框架分析
2.1.1 目录结构
tslib的主要代码文件结构:
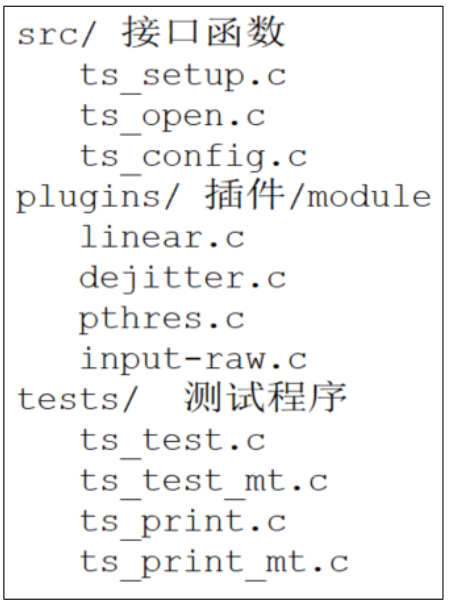
- 核心在于plugins目录,该目录下每一个文件都是一个module,每个module都提供2个函数:
read和read_mt,前者用于读取单点触摸屏数据,后者用于读取多点触摸屏数据 - test目录下是示例程序
2.1.2 框架结构
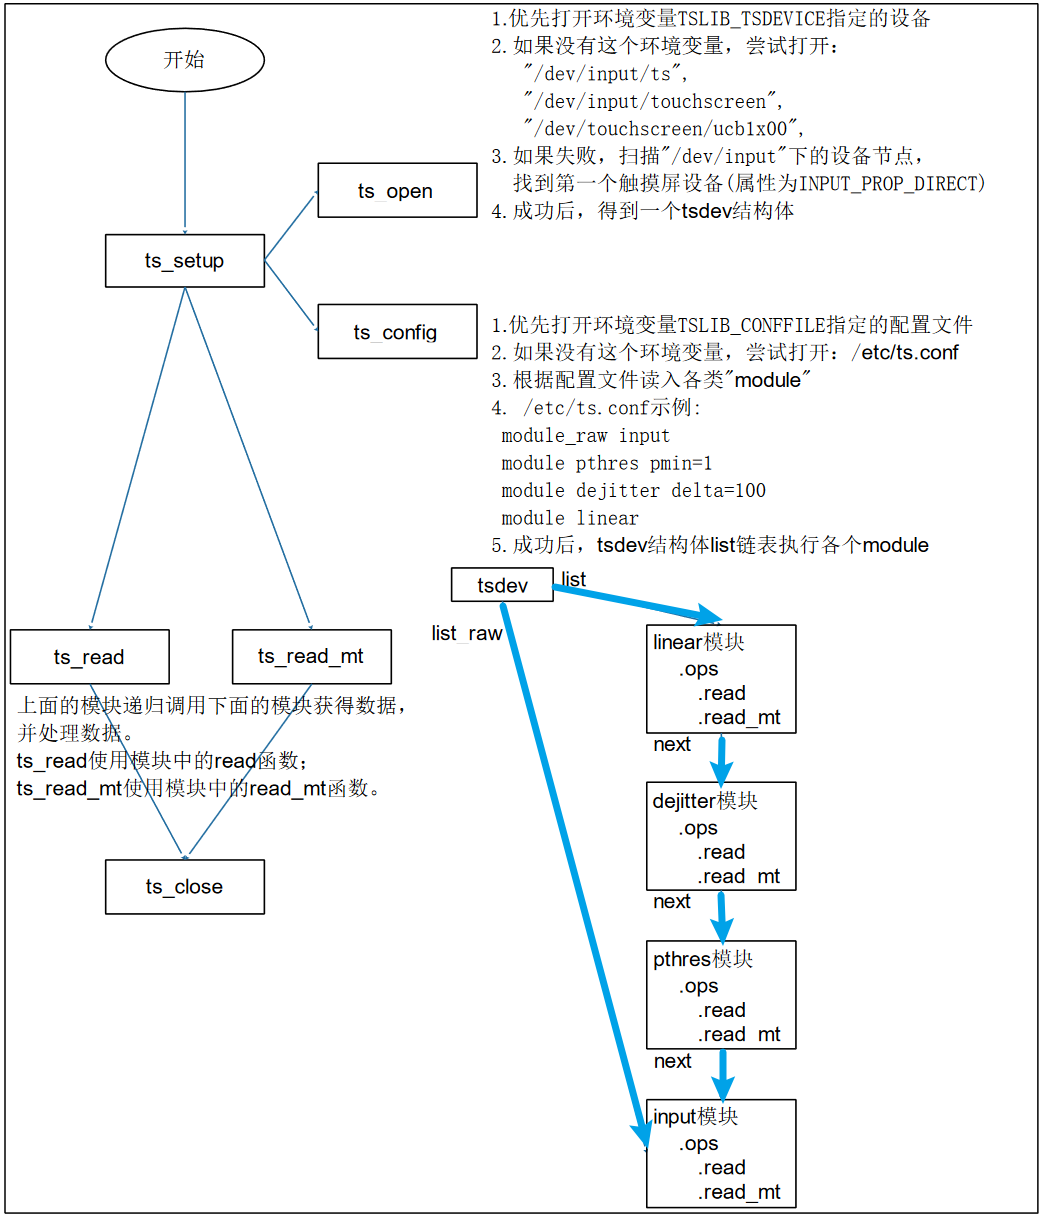
调用
ts_open后,可以打开某个设备节点,构造出一个tsdev结构体:1
2
3
4
5
6
7
8
9
10
11
12
13
14
15
16
17
18
19
20struct tsdev {
int fd;
char *eventpath; // 设备文件路径
struct tslib_module_info *list; // 数据处理路径链表
/* points to position in 'list' where raw reads
* come from. default is the position of the
* ts_read_raw module.
*/
struct tslib_module_info *list_raw; //一般指向最底层的数据处理模块
unsigned int res_x;
unsigned int res_y;
int rotation;
};
struct tslib_module_info {
struct tsdev *dev;
struct tslib_module_info *next; /* next module in chain */
void *handle; /* dl handle */
const struct tslib_ops *ops;
};调用
ts_config读取配置文件,假设/etc/ts.conf的内容如下:1
2
3
4module_raw input
module pthres pmin=1
module dejitter delta=100
module linear- 每行表示一个module或moduel_raw。对于module都会插入
tsdev.list表头(读取文件从上到下进行头插) - 对于所有的
module_raw都会插入tsdev.list_raw链表头,一般都只有一个module_raw
1
2
3
4
5
6
7int __ts_attach(struct tsdev *ts, struct tslib_module_info *info)
{
info->dev = ts;
info->next = ts->list;
ts->list = info;
return 0;
}- 每行表示一个module或moduel_raw。对于module都会插入
调用
ts_read或者ts_read_mt都是通过tsdev.list中的模块来处理数据,该过程是一个递归向下调用的过程:1
2
3
4
5
6
7
8static int linear_read(struct tslib_module_info *info, struct ts_sample *samp,
int nr_samples)
{
struct tslib_linear *lin = (struct tslib_linear *)info;
int ret;
int xtemp, ytemp;
//调用list中的下一个模块读取数据
ret = info->next->ops->read(info->next, samp, nr_samples);
2.2 编译和安装tslib
根据之前的知识,知道编译和安装库应该执行:
1 | ./configure --host=arm-buildroot-linux-gnueabihf --prefix=$PWD/tmp |
而ts_config函数首先会在环境变量TSLIB_CONFFILE指定的目录中寻找配置文件ts.conf,如果没有该环境变量,则会在宏定义TS_CONF中寻找配置文件ts.conf:
1 | if ((conffile = getenv("TSLIB_CONFFILE")) == NULL) { |
如果按照之前的命令去编译库,指定prefix=$PWD/tmp,则查找宏定义TS_CONF的值发现:
1 | grep -nwr "TS_CONF" . |
这意味着在开发板上配置文件ts.conf需要放在/home/book/vscodeFile/embbed_study/11_input/02_tslib/tslib-1.21/tmp/etc这样一个目录下,这显然太麻烦了。为了将ts.conf放在开发板的/etc/目录时能够找的到,需要改变一下prefix参数值:
1 | ./configure --host=arm-buildroot-linux-gnueabihf --prefix=/ |
按照上述命令,在执行make install会报错:
1 | libtool: error: error: cannot install 'linear.la' to a directory not ending in //lib/ts |
查找对应plugins/Makefile对应的代码:
1 | install-pluginexecLTLIBRARIES: $(pluginexec_LTLIBRARIES) |
这段代码在安装动态库文件pluginexec_LTLIBRARIES,原因大概率是目标目录$(DESTDIR)$(pluginexecdir)设置的有问题,通过查找DESTDIR发现:
1 | The second method involves providing the `DESTDIR' variable. For |
所以,可以通过DESTDIR来指定安装目录:
1 | make install DESTDIR=$PWD/tmp |
这样,即可实现安装在当前目录下,同时配置文件的寻找路径为/etc/了
2.2.1 将动态库和可执行程序放到开发板上
1 | cp /mnt/tslib-1.21/tmp/lib/*so* -d /lib |
2.3 使用tslib读取多点触摸数据
1 | //触点信息结构体 |
参考ts_test_mt.c,编写一个读取触点程序,实现如果有两个触点,则输出两个触点的距离的功能:
1 | struct tsdev *ts; |
之所以使用pre_sample_mt来备份信息,是因为如果触点接触之后没有移动,则第二次读取时该触点对应的有效位valid为非(不使用pre_sample_mt的话,判断tracking_id也可以实现类似的功能)