1. 编写驱动程序的框架 1.1 APP 打开的文件在内核中如何表示 APP 打开文件时,可以得到一个整数,这个整数被称为文件句柄。对于 APP 的每一个文件句柄,在内核里面都有一个struct file结构体与之对应:
1
2
3
4
5
6
7
8
9
10
11
12
13
14
15
16
17
18
19
20
21
struct file { union { struct llist_node fu_llist ; struct rcu_head fu_rcuhead ; } f_u; struct path f_path ; struct inode *f_inode ; const struct file_operations *f_op ; spinlock_t f_lock; atomic_long_t f_count; unsigned int f_flags; fmode_t f_mode; struct mutex f_pos_lock ; loff_t f_pos; struct fown_struct f_owner ; const struct cred *f_cred ; struct file_ra_state f_ra ;
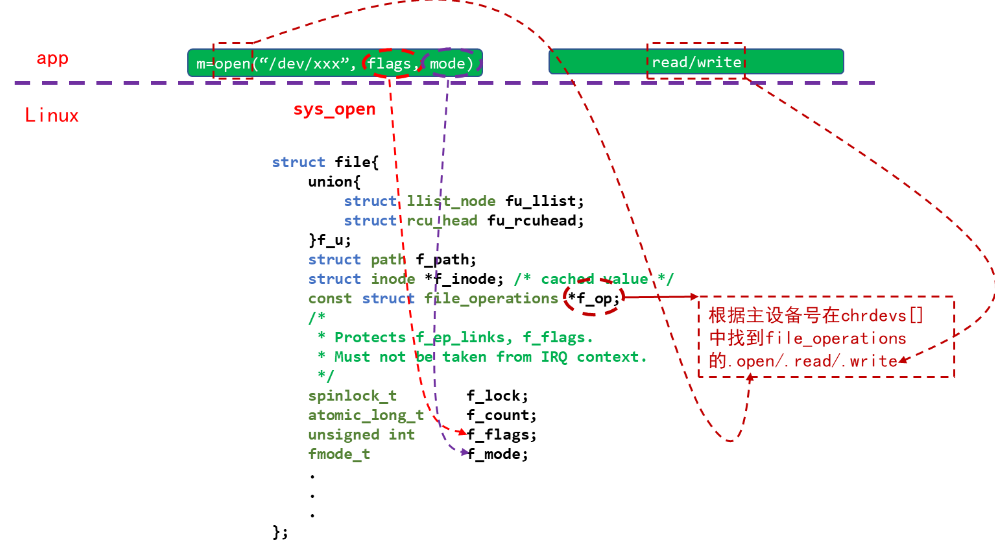
在APP中调用open函数打开文件时,传入的flags、mode等参数会记录在内核相应的struct file成员f_flags\f_mode中;读写文件的偏移地址也会保存在struct file结构体的f_pos成员中。
并且当APP中调用open函数时,会向下调用系统的sys_open函数,而sys_open函数又会根据主设备号来调用相应驱动的open函数;这些驱动函数的地址会保存在成员file_operations中:
1
2
3
4
5
6
7
8
9
10
11
12
13
14
15
16
17
struct file_operations { struct module *owner ; loff_t (*llseek) (struct file *, loff_t , int ); ssize_t (*read) (struct file *, char __user *, size_t , loff_t *); ssize_t (*write) (struct file *, const char __user *, size_t , loff_t *); ssize_t (*read_iter) (struct kiocb *, struct iov_iter *); ssize_t (*write_iter) (struct kiocb *, struct iov_iter *); int (*iterate) (struct file *, struct dir_context *); int (*iterate_shared) (struct file *, struct dir_context *); unsigned int (*poll) (struct file *, struct poll_table_struct *) ; long (*unlocked_ioctl) (struct file *, unsigned int , unsigned long ); long (*compat_ioctl) (struct file *, unsigned int , unsigned long ); int (*mmap) (struct file *, struct vm_area_struct *); int (*open) (struct inode *, struct file *); int (*flush) (struct file *, fl_owner_t id); int (*release) (struct inode *, struct file *); int (*fsync) (struct file *, loff_t , loff_t , int datasync);
将上面描述的过程用一张图进行说明:
PS:主设备号 主设备号是内核模块分配给设备驱动程序的唯一标识符,用于标识特定设备的整数值,它由设备驱动程序进行分配。设备驱动程序通过主设备号将特定的操作转发给相应的驱动程序中断例程和文件操作函数。文件描述符是应用程序与打开的文件之间的连接,而主设备号是内核用于路由I/O请求到正确设备驱动程序的标识符 。
1.2 编写驱动程序的步骤
确定主设备号,可以自己指定主设备号,也可以传入0,让内核给驱动程序分配主设备号
定义自己的 file_operations 结构体实现对应的 drv_open/drv_read/drv_write 等函数,填入 file_operations 结构体
把 file_operations 结构体告诉内核:使用register_chrdev函数
谁来注册驱动程序啊?得有一个入口函数:安装驱动程序时,就会去调用这个入口函数
有入口函数就应该有出口函数:卸载驱动程序时,出口函数调用 unregister_chrdev
其他完善:提供设备信息,自动创建设备节点:class_create, device_create
1.3 驱动程序框架示例 字符设备驱动程序的框架 :
代码示例 :
1 2 3 4 5 6 7 8 9 10 11 12 13 14 15 16 17 18 19 20 21 22 23 24 25 26 27 28 29 30 31 32 33 34 35 36 37 38 39 40 41 42 43 44 45 46 47 48 49 50 51 52 53 54 55 56 57 58 59 60 61 62 63 64 65 66 67 68 69 70 71 72 73 74 75 76 77 78 79 80 81 82 83 84 85 86 87 88 89 90 91 92 93 94 95 96 97 98 99 100 101 102 103 104 105 106 107 #include "asm/uaccess.h" #include "linux/err.h" #include "linux/kdev_t.h" #include "linux/printk.h" #include "linux/stddef.h" #include <linux/device.h> #include <linux/errno.h> #include <linux/fs.h> #include <linux/gfp.h> #include <linux/init.h> #include <linux/kernel.h> #include <linux/kmod.h> #include <linux/major.h> #include <linux/miscdevice.h> #include <linux/module.h> #include <linux/mutex.h> #include <linux/proc_fs.h> #include <linux/seq_file.h> #include <linux/stat.h> #include <linux/tty.h> static ssize_t hello_drv_open (struct inode *node, struct file *file) ;static ssize_t hello_drv_read (struct file *file, char __user *buf, size_t size, loff_t *ppos) ;static ssize_t hello_drv_write (struct file *file, const char __user *buf, size_t size, loff_t *ppos) ;static int hello_drv_close (struct inode *node, struct file *file) ;static int major_number = 0 ;static char kernel_buf[1024 ];static struct class *hello_class ;#define MIN(a, b) ((a < b) ? (a) : (b)) static struct file_operations hello_drv = .owner = THIS_MODULE, .open = hello_drv_open, .read = hello_drv_read, .write = hello_drv_write, .release = hello_drv_close, }; static ssize_t hello_drv_open (struct inode *node, struct file *file) { printk("%s %s line %d\n" , __FILE__, __FUNCTION__, __LINE__); return 0 ; } static ssize_t hello_drv_read (struct file *file, char __user *buf, size_t size, loff_t *ppos) { int err; printk("%s %s line %d\n" , __FILE__, __FUNCTION__, __LINE__); err = copy_to_user(buf, kernel_buf, MIN(size, 1024 )); return MIN(size, 1024 ); } static ssize_t hello_drv_write (struct file *file, const char __user *buf, size_t size, loff_t *ppos) { int err; printk("%s %s line %d\n" , __FILE__, __FUNCTION__, __LINE__); err = copy_from_user(kernel_buf, buf, MIN(size, 1024 )); return MIN(size, 1024 ); } static int hello_drv_close (struct inode *node, struct file *file) { printk("%s %s line %d\n" , __FILE__, __FUNCTION__, __LINE__); return 0 ; } static int __init hello_init (void ) { struct device *hello_device ; printk("%s %s line %d\n" , __FILE__, __FUNCTION__, __LINE__); major_number = register_chrdev(0 , "hello" , &hello_drv); hello_class = class_create(THIS_MODULE, "hello_class" ); if (IS_ERR(hello_class)) { unregister_chrdev(major_number, "hello" ); return PTR_ERR(hello_class); } hello_device = device_create(hello_class, NULL , MKDEV(major_number, 0 ), NULL , "hello" ); if (IS_ERR(hello_device)) return PTR_ERR(hello_device); return 0 ; } static void __exit hello_exit (void ) { printk("%s %s line %d\n" , __FILE__, __FUNCTION__, __LINE__); device_destroy(hello_class, MKDEV(major_number, 0 )); class_destroy(hello_class); unregister_chrdev(major_number, "hello" ); } module_init(hello_init); module_exit(hello_exit); MODULE_LICENSE("GPL" );
相应的APP测试程序很简单,使用open()函数打开设备节点“/dev/hello”,然后调用read()/write()读取/写入数据即可。
1.3.1 Makefile 使用如下Makefile将.c文件交叉编译为内核驱动模块.ko文件:
1
2
3
4
5
6
7
8
9
10
11
12
13
14
15
KERN_DIR = /home/book/100ask_imx6ull_mini-sdk/Linux-4.9.88 all: make -C $(KERN_DIR) M=`pwd` modules $(CROSS_COMPILE) gcc -o hello_drv_test hello_drv_test.c clean: make -C $(KERN_DIR) M=`pwd` modules clean rm -rf modules.order rm -f hello_drv_test obj-m += hello_drv.o
1.3.2 测试 1 2 3 4 5 6 insmod hello_drv.ko //安装内核驱动模块 cat /proc/devices // 查看/proc/devices文件,该文件列出字符和块设备的主设备号,以及分配到这些设备号的设备名称 lsmod // 列出所有已安装的内核模块 ls /dev/hello -l // 查看设备节点是否存在 rmmod hello_drv // 卸载内核驱动模块 dmesg // 查看内核输出的打印信息
1.4 Hello驱动程序的中的知识点 1.4.1 module_init/module_exit 的实现 一个驱动程序有入口/出口函数:
1 2 module_init(hello_init); module_exit(hello_exit);
驱动程序可以被直接编入内核,也可以被编译为ko文件后手工加载。对于这两种方式,module_init/module_exit宏是不一样的,在内核文件include\linux\module.h可以找到:
1 2 3 4 5 6 7 8 9 10 11 12 13 14 15 16 17 18 19 20 #ifndef MODULE #define module_init(x) __initcall(x); #define module_exit(x) __exitcall(x); #else #define module_init(initfn) \ static inline initcall_t __inittest(void) \ { return initfn; } \ int init_module(void) __attribute__((alias(#initfn))); #define module_exit(exitfn) \ static inline exitcall_t __exittest(void) \ { return exitfn; } \ void cleanup_module(void) __attribute__((alias(#exitfn))); #endif
(1) 编译为ko文件 编译驱动程序时,我们执行make modules这样的命令,它在编译 c 文件时会定义宏 MODULE,例如:
1 arm-buildroot-linux-gnueabihf-gcc -DMODULE -c -o hello_drv.o hello_drv.c
那么将else下面的宏展开之后可以得到:
1 2 3 4 5 6 7 static inline initcall_t __inittest(void) \ { return hello_init; } \ int init_module(void) __attribute__((alias("hello_init"))); static inline exitcall_t __exittest(void) \ { return hello_exit; } \ void cleanup_module(void) __attribute__((alias("hello_exit")));
分别定义了 2 个函数:第 1 个函数名为 init_module,它是 hello_init 函数的别名;第 2 个函数名为 cleanup_module,它是 hello_exit 函数的别名。 以后我们使用 insmod 命令加载驱动时,内核都是调用 init_module 函数, 实际上就是调用 hello_init 函数;使用 rmmod 命令卸载驱动时,内核都是调用 cleanup_module 函数,实际上就是调用 hello_exit 函数。
(2) 编译进内核 将#ifndef下面的宏展开之后可以得到:
1 2 3 static initcall_t __initcall_hello_init6 __used \ __attribute__((__section__(".initcall6.init" ))) = hello_init; static exitcall_t __exitcall_hello_exit __used __section(.exitcall.exit ) = hello_exit;
其中的initcall_t、exitcall_t就是函数指针类型,所以上述代码就是定义了两个函数指针:第 1 个函数指针名为__initcall_hello_init6,放在段.initcall6.init里;第 2 个函数指针名为__exitcall_hello_exit, 放在段.exitcall.exit里。
内核启动时,会去段.initcall6.init里取出这些函数指针来执行,所以 驱动程序的入口函数就被执行了。
一个驱动被编进内核后,它是不会被卸载的,所以段.exitcall.exit 不会被用到,内核启动后会释放这块段空间。
1.4.2 register_chrdev的内部实现 1 2 3 4 5 static inline int register_chrdev (unsigned int major, const char *name, const struct file_operations *fops) { return __register_chrdev(major, 0 , 256 , name, fops); }
它调用__register_chrdev函数:
1 2 3 4 5 6 7 8 9 10 11 12 13 14 15 16 17 18 19 20 21 22 23 24 25 26 27 28 29 30 31 32 33 34 int __register_chrdev(unsigned int major, unsigned int baseminor, unsigned int count, const char *name, const struct file_operations *fops) { struct char_device_struct *cd ; struct cdev *cdev ; int err = -ENOMEM; cd = __register_chrdev_region(major, baseminor, count, name); if (IS_ERR(cd)) return PTR_ERR(cd); cdev = cdev_alloc(); if (!cdev) goto out2; cdev->owner = fops->owner; cdev->ops = fops; kobject_set_name(&cdev->kobj, "%s" , name); err = cdev_add(cdev, MKDEV(cd->major, baseminor), count); if (err) goto out; cd->cdev = cdev; return major ? 0 : cd->major; out: kobject_put(&cdev->kobj); out2: kfree(__unregister_chrdev_region(cd->major, baseminor, count)); return err; }
(1)__register_chrdev_region(major, baseminor, count, name) 作用 :查看设备号(major, baseminor)到(major, baseminor+count-1) 有没有被占用,如果未被占用的话,就使用这块区域。
之前为了方便理解简化模型,认为内核里有一个 chrdevs 数组, 根据主设备号 major 在 chrdevs[major] 中放入 file_operations 结构体,以后 open/read/write 某个设备文件时,就是根据主设备号从 chrdevs[major] 中取出 file_operations 结构体,调用里面的 open/read/write 函数指针。
实际上,内核中确实有一个chrdevs数组:
1 2 3 4 5 6 7 8 static struct char_device_struct { struct char_device_struct *next ; unsigned int major; unsigned int baseminor; int minorct; char name[64 ]; struct cdev *cdev ; } *chrdevs[CHRDEV_MAJOR_HASH_SIZE];
但是去访问它的时候,并不是直接使用主设备号 major 来确定数组项,而是使用如下函数来确定数组项:
1 2 3 4 5 static inline int major_to_index (unsigned major) { return major % CHRDEV_MAJOR_HASH_SIZE; }
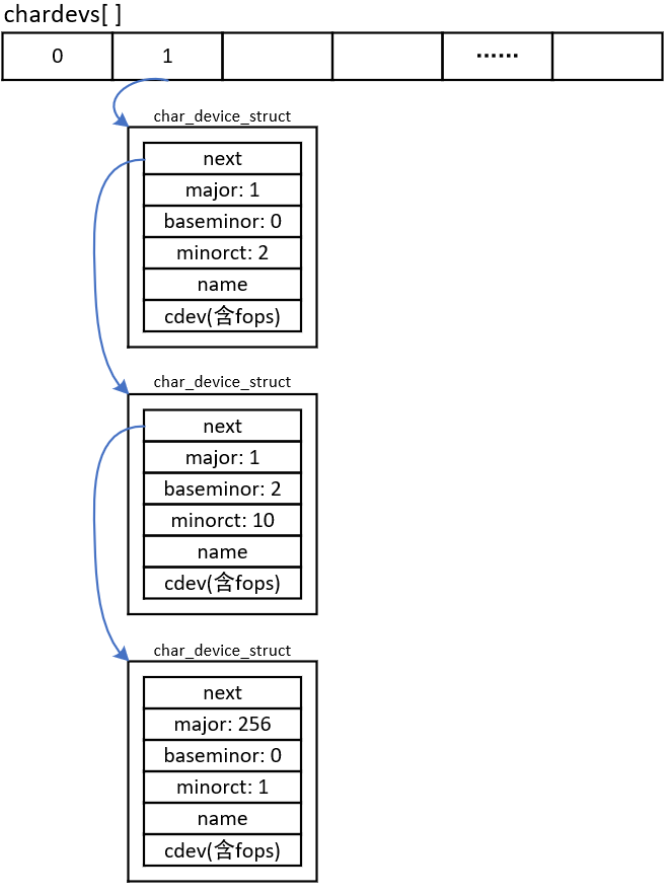
上述代码中,CHRDEV_MAJOR_HASH_SIZE 等于 255。比如主设备号1、256, 都会使用 chrdevs[1] 。 chrdevs[1] 是一个链表,链表里有多个 char_device_struct 结构体,某个结构体表示主设备号为 1 的设备,某个结构体表示主设备号为 256 的设备,如下图:
chrdevs[i]数组项是一个链表头,链表中的每一个元素都是char_device_struct结构体,每一个元素都表示一个驱动程序。char_device_struct结构体每一个成员表示如下:
major:主设备号baseminor:次设备号minorct:个数cdev:在cdev中含有file_operations结构体
在上图中,chrdevs[1]中有3个驱动程序:
第 1 个 char_device_struct 结构体对应主次设备号(1, 0)、(1, 1),这 是第 1 个驱动程序。
第 2 个 char_device_struct 结构体对应主次设备号(1, 2)、(1, 2)、......、 (1, 11),这是第 2 个驱动程序。
第 3 个 char_device_struct 结构体对应主次设备号(256, 0),这是第 3 个驱动程序。
(2)cdev_add(cdev, MKDEV(cd->major, baseminor), count) 1 2 3 4 5 6 7 8 9 10 11 12 13 14 15 16 int cdev_add (struct cdev *p, dev_t dev, unsigned count) { int error; p->dev = dev; p->count = count; error = kobj_map(cdev_map, dev, count, NULL , exact_match, exact_lock, p); if (error) return error; kobject_get(p->kobj.parent); return 0 ; }
这个函数涉及 kobj 的操作,这是一个通用的链表操作函数。它的作用是: 把 cdev 结构体放入 cdev_map 链表中,对应的索引值是dev到dev+count-1。以后可以从 cdev_map 链表中快速地使用索引值取出对应的 cdev。
例如执行:
1 err = cdev_add(cdev, MKDEV(1 , 2 ), 10 );
其中MKDEV(1,2)构造出一个整数1<<8 | 2;上述代码将结构体cdev放入cdev_map链表中,对应的索引值是0x102到0x102+10;根据(0x102~0x102+10)范围内的10个数值中的任意一个,都可以从cdev_map链表中取出cdev结构体。
APP 打开某个字符设备节点时,进入内核。在内核里根据字符设备节点的主、次设备号,计算出一个数值major<<8 | minor,即 inode->i_rdev,然后使用这个数值从 cdev_map 中快速得到 cdev,再从 cdev 中得到 file_operations 结构体。
关键函数如下:
1 2 3 4 5 6 7 8 9 10 11 12 13 14 15 16 17 18 19 20 21 22 23 static int chrdev_open (struct inode *inode, struct file *filp) { const struct file_operations *fops ; struct cdev *p ; struct cdev *new =NULL ; int ret = 0 ; spin_lock(&cdev_lock); p = inode->i_cdev; if (!p) { struct kobject *kobj ; int idx; spin_unlock(&cdev_lock); kobj = kobj_lookup(cdev_map, inode->i_rdev, &idx); if (!kobj) return -ENXIO; new = container_of(kobj, struct cdev, kobj); spin_lock(&cdev_lock);
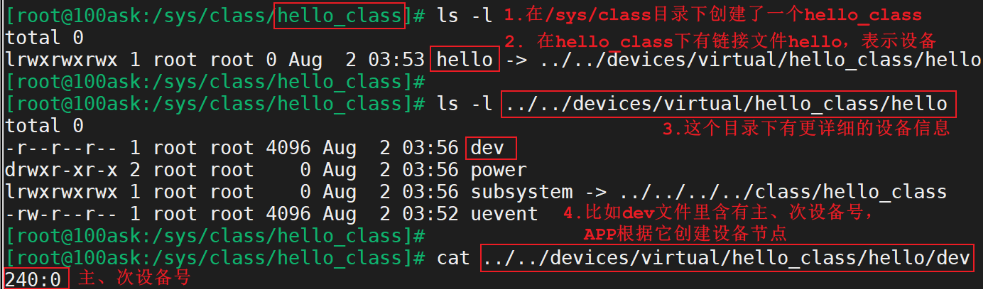
1.4.3 class_destroy/device_create浅析 驱动程序的核心是 file_operations 结构体:分配、设置、注册它。 class_destroy/device_create函数知识起一些辅助作用:在/sys 目录下创建一些目录、文件,这样 Linux 系统中的 APP(比如 udev、mdev)就可以根据这些目录或文件来创建设备节点。
以下代码将会在 /sys/class 目录下创建一个子目录 hello_class:
1 hello_class = class_create(THIS_MODULE, "hello_class" );
以下代码会在 /sys/class/hello_class 目录下创建一个文件 hello:
1 device_create(hello_class, NULL , MKDEV(major, 0 ), NULL , "hello" );
1.4.4 主次设备号 字符设备的次设备号通常用于区分同一类型的不同设备实例,这些设备在类型上是相同的,但它们是不同的设备实例,通常代表不同的物理设备或虚拟设备,例如:
串口设备 :串口设备通常使用字符设备接口来表示。在一台计算机上,你可能会有多个串口,每个串口都有一个唯一的设备文件(例如 /dev/ttyS0, /dev/ttyS1)。这些串口设备都属于相同的类型(串口设备),但是每个串口是不同的设备实例。磁盘分区 :磁盘设备通常被划分成多个分区,每个分区都可以被视为一个不同的字符设备。这些分区都属于相同的磁盘类型,但每个分区是不同的设备实例。虚拟终端设备 :虚拟终端设备(例如 /dev/pts/0, /dev/pts/1)用于提供终端会话。每个虚拟终端代表一个不同的终端会话,尽管它们都属于相同的虚拟终端设备类型。网络设备 :在某些情况下,网络设备也可以表示为字符设备。不同的网络接口(例如 eth0, eth1)属于相同类型的字符设备,但它们是不同的设备实例,每个代表一个不同的网络接口。
在这些情况下,主设备号通常用于标识设备类型,而次设备号用于区分不同的设备实例。这使得用户空间程序可以正确识别和与多个设备进行交互,而内核可以根据主设备号和次设备号来路由请求到适当的设备驱动程序。这种灵活性对于操作系统和应用程序来说非常重要,因为它们需要同时处理多个设备实例,每个实例都有不同的特性和状态。
 ·
·