0%

LED驱动程序框架

1.LED驱动程序框架设计-分离

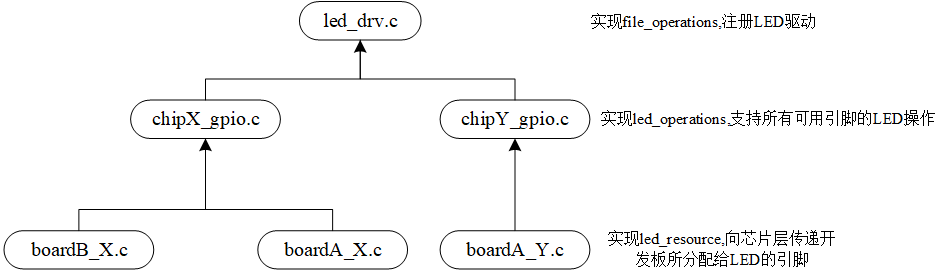
在上一篇博文中编写的驱动程序仅能操作固定开发板上的一个LED灯。考虑现实情况,使用同一款主控芯片,不同厂家可能会设计不同的PCB板,针对硬件使用的芯片引脚各不相同,但是同一款主控针对同一硬件的设置都是相似的。因此,我们考虑针对通用LED驱动程序,主控芯片,开发板来分离出三层,以便我们的LED驱动程序能够支持不同主控不同开发板使用:

image-20231202161816859

1.1 开发板层

led_resources.h

1
2
3
4
5
6
7
8
9
10
11
12
13
14
#ifndef _LED_RESOURCES_H_
#define _LED_RESOURCES_H_

#define GROUP(x) (x >> 16)
#define PIN(x) (x & 0xFFFF)
#define GROUP_PIN(g, p) ((g << 16) | (p))

struct led_resources {
int pins[10];
int num;
};
struct led_resources *get_led_resouce(void);

#endif // !_LED_RESOUS_H_

board_A_imx6ull.c

1
2
3
4
5
6
7
8
9
10
11
#include "led_resources.h"
// static:该变量对外不可见,仅能通过get_led_resource函数获取
struct led_resources board_A_imx6ll = {
.pins = { GROUP_PIN(5, 3), GROUP_PIN(1, 1)},
.num = 2,
};

struct led_resources *get_led_resouce(void)
{
return &board_A_imx6ll;
}

在该层主要定义开发板上所分别的LED资源,通过定义结构体led_resources并向上一层提供get函数。

在示例中定义了GPIO5_3GPIO1_1两个LED引脚。针对不同的开发板需要编写不同.c文件来定义LED引脚。

1.2 芯片层

led_operations.h

1
2
3
4
5
6
7
8
9
10
11
12
13
14
15
16
17
18
19
20
21
22
23
24
25
26
27
28
#ifndef _LED_OPERATIONS_H_
#define _LED_OPERATIONS_H_

#define IOMUXC_SNVS_BASE_ADDRESS 0x02290000
#define IOMUXC_SNVS_SW_MUX_CTL_PAD_SNVS_TAMPER3 (IOMUXC_SNVS_BASE_ADDRESS + 0x14)
#define IOMUXC_SNVS_SW_PAD_CTL_PAD_SNVS_TAMPER3 (IOMUXC_SNVS_BASE_ADDRESS + 0x58)

#define IOMUXC_BASE_ADDRESS 0x020E0000
#define IOMUXC_SW_MUX_CTL_PAD_GPIO1_IO01 (IOMUXC_BASE_ADDRESS + 0x60)
#define IOMUXC_SW_PAD_CTL_PAD_GPIO1_IO01 (IOMUXC_BASE_ADDRESS + 0x2EC)

#define GPIO5_BASE_ADDRESS 0x020AC000
#define GPIO5_GDIR (GPIO5_BASE_ADDRESS + 0x04)
#define GPIO5_DR (GPIO5_BASE_ADDRESS + 0x00)

#define GPIO1_BASE_ADDRESS 0x0209C000
#define GPIO1_GDIR (GPIO1_BASE_ADDRESS + 0x04)
#define GPIO1_DR (GPIO1_BASE_ADDRESS + 0x00)

struct led_operations {
int (*init)(int which);
int (*ctl) (int which, char status);
int (*get_led_num)(void);
int (*close)(void);
};

struct led_operations *get_chip_led_operations(void);
#endif // !_LED_OPERATIONS_H_

在芯片层的.h文件中,定义所有可能成为LED引脚的相关寄存器地址(当然作为测试仅定义了GPIO5_3GPIO1_1的相关寄存器),以及定义该芯片实现LED操作所需要的函数,以供上一层调用。

chip_imx6ull_gpio.c

1
2
3
4
5
6
7
8
9
10
11
12
13
14
15
16
17
18
19
20
21
22
23
24
25
26
27
28
29
30
31
32
33
34
35
36
37
38
39
40
41
42
43
44
45
46
47
48
49
50
51
52
53
54
55
56
57
58
59
60
61
62
63
64
65
66
67
68
69
70
71
72
73
74
75
76
77
78
79
80
81
82
83
84
85
86
87
88
89
90
91
92
#include "led_operations.h"
#include "led_resources.h"
#include <asm/io.h>
#include <linux/string.h>
#include <linux/types.h>

static struct led_resources *led_rsc = NULL;
/* registers */
static volatile unsigned int *IOMUXC_MUX_CTL_PAD_Pin_Virtual;
static volatile unsigned int *IOMUXC_PAD_CTL_PAD_Pin_Virtual;
static volatile unsigned int *GPIOx_GDIR_Virtual;
static volatile unsigned int *GPIOx_DR_Virtual;

static int chip_led_init(int which) /* 初始化LED, which-哪个LED */
{
uint32_t val;
printk("%s %s line %d, led %d\n", __FILE__, __FUNCTION__, __LINE__, which);
if (!led_rsc)
led_rsc = get_led_resouce();
if (which > led_rsc->num)
return -1;
printk("init gpio: group %d, pin %d\n", GROUP(led_rsc->pins[which]), PIN(led_rsc->pins[which]));
switch (led_rsc->pins[which])
{
case GROUP_PIN(5, 3): {
printk("init pin of GPIO5_3 ...\n");
IOMUXC_MUX_CTL_PAD_Pin_Virtual = ioremap(IOMUXC_SNVS_SW_MUX_CTL_PAD_SNVS_TAMPER3, 4);
IOMUXC_PAD_CTL_PAD_Pin_Virtual = ioremap(IOMUXC_SNVS_SW_PAD_CTL_PAD_SNVS_TAMPER3, 4);
GPIOx_GDIR_Virtual = ioremap(GPIO5_GDIR, 4);
GPIOx_DR_Virtual = ioremap(GPIO5_DR, 4);

*GPIOx_GDIR_Virtual |= (1 << 3); // 配置引脚为输出模式
*GPIOx_DR_Virtual |= (1 << 3); // 先熄灭LED
break;
}
case GROUP_PIN(1, 1): {
printk("init pin of group GPIO1_1 ...\n");
IOMUXC_MUX_CTL_PAD_Pin_Virtual = ioremap(IOMUXC_SW_MUX_CTL_PAD_GPIO1_IO01, 4);
IOMUXC_PAD_CTL_PAD_Pin_Virtual = ioremap(IOMUXC_SW_PAD_CTL_PAD_GPIO1_IO01, 4);
GPIOx_GDIR_Virtual = ioremap(GPIO1_GDIR, 4);
GPIOx_DR_Virtual = ioremap(GPIO1_DR, 4);
break;
}
}
val = *IOMUXC_MUX_CTL_PAD_Pin_Virtual;
*IOMUXC_MUX_CTL_PAD_Pin_Virtual = (val & (~0xf)) | 0x5; // 先清除,再赋值,失能测试模式,配置复用为ALT5
*GPIOx_GDIR_Virtual |= (1 << PIN(led_rsc->pins[which])); // 配置引脚为输出模式
*GPIOx_DR_Virtual |= (1 << PIN(led_rsc->pins[which])); // 先熄灭LED
return 0;
}

static int chip_led_ctl(int which, char status) /* 控制LED, which-哪个LED, status:1-亮,0-灭 */
{
printk("%s %s line %d, led %d, status: %s\n", __FILE__, __FUNCTION__, __LINE__, which,
(status == 1 ? "on" : "off"));
printk("set led %s: group %d, pin %d\n", status ? "on" : "off", GROUP(led_rsc->pins[which]),
PIN(led_rsc->pins[which]));

if (status)
*GPIOx_DR_Virtual &= ~(1 << PIN(led_rsc->pins[which])); /* set led on*/
else
*GPIOx_DR_Virtual |= (1 << PIN(led_rsc->pins[which])); /* set led off */
return 0;
}

static int get_board_led_num(void)
{
if (!led_rsc)
led_rsc = get_led_resouce();
return led_rsc->num;
}

static int chip_led_close(void)
{
iounmap(IOMUXC_MUX_CTL_PAD_Pin_Virtual);
iounmap(IOMUXC_PAD_CTL_PAD_Pin_Virtual);
iounmap(GPIOx_GDIR_Virtual);
iounmap(GPIOx_DR_Virtual);
return 0;
}

static struct led_operations chip_imx6ll_led_opr = {
.init = chip_led_init,
.ctl = chip_led_ctl,
.close = chip_led_close,
.get_led_num = get_board_led_num,
};

struct led_operations *get_chip_led_operations(void)
{
return &chip_imx6ll_led_opr;
}

在芯片层的.c文件中实现了led_operations结构体中定义函数,该.c文件所实现的函数是针对imx6ull芯片而开发的。支持其他芯片在新的.c文件中实现相应的操作逻辑。

1.3 通用LED驱动程序

1
2
3
4
5
6
7
8
9
10
11
12
13
14
15
16
17
18
19
20
21
22
23
24
25
26
27
28
29
30
31
32
33
34
35
36
37
38
39
40
41
42
43
44
45
46
47
48
49
50
51
52
53
54
55
56
57
58
59
60
61
62
63
64
65
66
67
68
69
70
71
72
73
74
75
76
77
78
79
80
81
82
83
84
85
86
87
88
89
90
91
92
93
94
95
96
97
98
99
100
101
102
103
104
105
106
107
108
109
110
111
112
113
114
115
116
#include "led_operations.h"
#include "linux/printk.h"
#include <linux/device.h>
#include <linux/errno.h>
#include <linux/fs.h>
#include <linux/gfp.h>
#include <linux/init.h>
#include <linux/kernel.h>
#include <linux/kmod.h>
#include <linux/major.h>
#include <linux/miscdevice.h>
#include <linux/module.h>
#include <linux/mutex.h>
#include <linux/proc_fs.h>
#include <linux/seq_file.h>
#include <linux/stat.h>
#include <linux/tty.h>

/* 1. 确定主设备号 */
static int major = 0;
static struct class *led_class;
struct led_operations *p_led_opr;
int led_num;

#define MIN(a, b) (a < b ? a : b)

/* 3. 实现对应的open/read/write等函数,填入file_operations结构体 */
static ssize_t led_drv_read(struct file *file, char __user *buf, size_t size, loff_t *offset)
{
printk("%s %s line %d\n", __FILE__, __FUNCTION__, __LINE__);
return 0;
}

/* write(fd, &val, 1); */
static ssize_t led_drv_write(struct file *file, const char __user *buf, size_t size, loff_t *offset)
{
int err;
char status;
struct inode *inode = file_inode(file);
int minor = iminor(inode);

printk("%s %s line %d\n", __FILE__, __FUNCTION__, __LINE__);
err = copy_from_user(&status, buf, 1);
/* 根据次设备号和status控制LED */
p_led_opr->ctl(minor, status);
return err;
}

static int led_drv_open(struct inode *node, struct file *file)
{
int ret;
int minor = iminor(node);
printk("%s %s line %d\n", __FILE__, __FUNCTION__, __LINE__);
/* 根据次设备号初始化LED */
ret = p_led_opr->init(minor);
return ret;
}

static int led_drv_close(struct inode *node, struct file *file)
{
printk("%s %s line %d\n", __FILE__, __FUNCTION__, __LINE__);
p_led_opr->close();
return 0;
}

/* 2. 定义自己的file_operations结构体 */
static struct file_operations led_drv = {
.owner = THIS_MODULE,
.open = led_drv_open,
.read = led_drv_read,
.write = led_drv_write,
.release = led_drv_close,
};

/* 4. 把file_operations结构体告诉内核:注册驱动程序 */
/* 5. 谁来注册驱动程序啊?得有一个入口函数:安装驱动程序时,就会去调用这个入口函数 */
static int __init led_init(void)
{
int err, i;
printk("%s %s line %d\n", __FILE__, __FUNCTION__, __LINE__);
major = register_chrdev(0, "krocz_led", &led_drv); /* /dev/led */
led_class = class_create(THIS_MODULE, "krocz_led_class");
err = PTR_ERR(led_class);
if (IS_ERR(led_class))
{
printk("%s %s line %d\n", __FILE__, __FUNCTION__, __LINE__);
unregister_chrdev(major, "krocz_led");
return -1;
}
p_led_opr = get_chip_led_operations();
if(p_led_opr == NULL)
{
printk("get led operations failed!\n");
return -1;
}
led_num = p_led_opr->get_led_num();
for (i = 0; i < led_num; i++)
device_create(led_class, NULL, MKDEV(major, i), NULL, "krocz_led%d", i); /* /dev/krocz_led0,1,... */
return 0;
}

/* 6. 有入口函数就应该有出口函数:卸载驱动程序时,就会去调用这个出口函数 */
static void __exit led_exit(void)
{
int i;
printk("%s %s line %d\n", __FILE__, __FUNCTION__, __LINE__);
for (i = 0; i < led_num; i++)
device_destroy(led_class, MKDEV(major, i)); /* /dev/krocz_led0,1,... */
class_destroy(led_class);
unregister_chrdev(major, "krocz_led");
}

/* 7. 其他完善:提供设备信息,自动创建设备节点 */
module_init(led_init);
module_exit(led_exit);
MODULE_LICENSE("GPL");

该驱动程序就是通用的驱动框架,只不过具体的引脚以及不同芯片针对引脚的寄存器操作都被分离到芯片层和开发板层了。在使用时,只需要利用下面提供的Makefile将通用LED驱动和相应的芯片.c文件和相应开发板的.c文件进行编译链接即可:

1
2
3
4
5
6
7
8
9
10
11
12
13
14
15
16
17
18
KERN_DIR = /home/book/100ask_imx6ull_mini-sdk/Linux-4.9.88

all:
make -C $(KERN_DIR) M=`pwd` modules
$(CROSS_COMPILE)gcc -o krocz_led_test ledtest.c

clean:
make -C $(KERN_DIR) M=`pwd` modules clean
rm -rf modules.order
rm -f ledtest

# 参考内核源码drivers/char/ipmi/Makefile
# 要想把a.c, b.c编译成ab.ko, 可以这样指定:
# ab-y := a.o b.o
# obj-m += ab.o

krocz_led-y := led_drv.o chip_imx6ll_gpio.o board_A_imx6ll_led.o
obj-m += krocz_led.o

通过分层的方式,从而实现了解耦合,使得我们的LED驱动程序具有通用性。

1.4 测试程序

1
2
3
4
5
6
7
8
9
10
11
12
13
14
15
16
17
18
19
20
21
22
23
24
25
26
27
28
29
30
31
32
33
34
35
36
37
38
39
40
41
42
43
#include <sys/types.h>
#include <sys/stat.h>
#include <fcntl.h>
#include <unistd.h>
#include <stdio.h>
#include <string.h>

//用法: ./ledtest /dev/krocz_led<0 | 1> <on | off>
int main(int argc, char **argv)
{
int fd;
char status;

/* 1. 判断参数 */
if (argc != 3)
{
printf("Usage: %s <dev> <on | off>\n", argv[0]);
return -1;
}

/* 2. 打开文件 */
fd = open(argv[1], O_RDWR);
if (fd == -1)
{
printf("can not open file %s\n", argv[1]);
return -1;
}

/* 3. 写文件 */
if (0 == strcmp(argv[2], "on"))
{
status = 1;
write(fd, &status, 1);
}
else
{
status = 0;
write(fd, &status, 1);
}
close(fd);

return 0;
}

2. 总线设备驱动模型

在第1节的基础上,进一步考虑支持开发板上的所有硬件资源。在第1节中,我们主要定义了两个结构体:

1
2
3
4
5
6
7
8
9
10
11
struct led_resources {
int pins[10];
int num;
};

struct led_operations {
int (*init)(int which);
int (*ctl) (int which, char status);
int (*get_led_num)(void);
int (*close)(void);
};

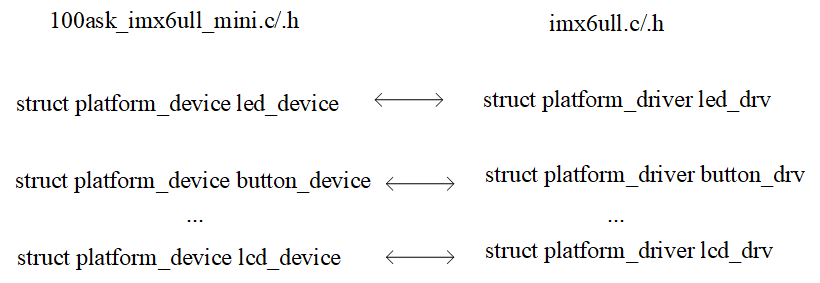
并通过相应的.c文件对结构体的内容进行填充。不同的硬件对应的引脚配置和操作函数大体上都是类似的,我们可以考虑定义一个通用的引脚配置结构体struct platform_device和通用的操作配置结构体struct platform_driver,然后在一个.c文件中实现针对主控芯片的所有硬件的操作函数,在另一个.c文件中实现针对某一款开发板的所有硬件的引脚定义,从而将第1节的分离思想应用到所有的硬件:

image-20231218153656623

2.1 理解Bus/Dev/Drv模型

结构体platform_device的定义:

1
2
3
4
5
6
7
8
9
10
11
12
13
14
15
16
17
struct platform_device {
const char *name;
int id;
bool id_auto;
struct device dev;
u32 num_resources;
struct resource *resource;

const struct platform_device_id *id_entry;
char *driver_override; /* Driver name to force a match */

/* MFD cell pointer */
struct mfd_cell *mfd_cell;

/* arch specific additions */
struct pdev_archdata archdata;
};

目前用到的几个结构体成员:

  • name:自定义的设备名称,可以根据该名称将platform_deviceplatform_driver进行匹配
  • resource:硬件引脚资源结构体
  • num_resources:资源的数量
  • driver_override:首先匹配driver_override所表示的platform_driver

结构体struct resource

1
2
3
4
5
6
7
8
struct resource {
resource_size_t start;
resource_size_t end;
const char *name;
unsigned long flags;
unsigned long desc;
struct resource *parent, *sibling, *child;
};
  • start/end:用来表示地址的u32整型数据

  • name:引脚名称标识

  • flag:标识引脚资源类型,后面platform_get_resource的参数 type 指的类别就是下面这些

    1
    2
    3
    4
    5
    6
    7
    8
    9
    10
    11
    12
    13
    14
    15
    /*
    * IO resources have these defined flags.
    *
    * PCI devices expose these flags to userspace in the "resource" sysfs file,
    * so don't move them.
    */
    #define IORESOURCE_BITS 0x000000ff /* Bus-specific bits */

    #define IORESOURCE_TYPE_BITS 0x00001f00 /* Resource type */
    #define IORESOURCE_IO 0x00000100 /* PCI/ISA I/O ports */
    #define IORESOURCE_MEM 0x00000200
    #define IORESOURCE_REG 0x00000300 /* Register offsets */
    #define IORESOURCE_IRQ 0x00000400
    #define IORESOURCE_DMA 0x00000800
    #define IORESOURCE_BUS 0x00001000

结构体platform_driver

1
2
3
4
5
6
7
8
9
10
struct platform_driver {
int (*probe)(struct platform_device *);
int (*remove)(struct platform_device *);
void (*shutdown)(struct platform_device *);
int (*suspend)(struct platform_device *, pm_message_t state);
int (*resume)(struct platform_device *);
struct device_driver driver;
const struct platform_device_id *id_table;
bool prevent_deferred_probe;
};

比较重要的几个成员:

  • probe:当总线扫描到设备树中的platform_device并与相应的platform_driver进行匹配之后,内核会调用probe函数,probe(探针)函数包含了初始化设备的逻辑。
  • remove:当总线或者内核监测到硬件设备拔出事件之后,通常会触发对应驱动程序调用remove函数,该函数包含清理设备资源的逻辑。
  • driver->name:与platform_device的name或者driver_override成员进行匹配的名称
  • id_table:表示该 drv 支持若干 个 device,它里面列出了各个 device 的{.name, .driver_data},其中的name表示该 drv 支持的设备的名字,driver_data 是些提供给该 device 的私有数据,与platform_device的name进行匹配

2.1.1 Dev和Drv的匹配

(1) 匹配优先级(大概了解,后面详细讲)
  1. 最先比较platform_device.driver_overrideplatform_driver.driver.name
  2. 然后比较platform_device.nameplatform_driver.id_table[i].name
  3. 最后比较platform_device.nameplatform_driver.driver.name
(2) 函数调用关系
1
2
3
4
5
6
7
8
9
10
11
12
13
14
15
16
17
18
19
20
platform_device_register 
platform_device_add
device_add
bus_add_device // 放入链表
bus_probe_device // probe 枚举设备,即找到匹配的(dev, drv)
device_initial_probe
__device_attach
bus_for_each_drv(...,__device_attach_driver,...) __device_attach_driver
driver_match_device(drv, dev) // 是否匹配
driver_probe_device // 调用 drv 的 probe

platform_driver_register
__platform_driver_register
driver_register
bus_add_driver // 放入链表
driver_attach(drv)
bus_for_each_dev(drv->bus, NULL, drv, __driver_attach);
__driver_attach
driver_match_device(drv, dev) // 是否匹配
driver_probe_device // 调用 drv 的 probe

2.1.2 常用函数

这些函数在内核源码:drivers/base/platform.c

(1) 注册/取消注册

1
2
3
platform_device_register/ platform_device_unregister 
platform_driver_register/ platform_driver_unregister
platform_add_devices // 注册多个 device

(2) 获取资源

返回该 dev 中某类型(type)资源中的第几个(num):

1
struct resource *platform_get_resource(struct platform_device *dev, unsigned int type, unsigned int num)

返回该 dev 所用的第几个(num)中断:

1
int platform_get_irq(struct platform_device *dev, unsigned int num)

通过名字(name)返回该 dev 的某类型(type)资源:

1
struct resource *platform_get_resource_byname(struct platform_device *dev, unsigned int type, const char *name)

通过名字(name)返回该 dev 的中断号:

1
int platform_get_irq_byname(struct platform_device *dev, const char *name)

2.2 编写代码

2.2.1 开发板层

board_A_imx6ull.c

1
2
3
4
5
6
7
8
9
10
11
12
13
14
15
16
17
18
19
20
21
22
23
24
25
26
27
28
29
30
31
32
33
34
35
36
37
38
39
40
41
static void led_dev_release(struct device *dev)
{
}

static struct resource resources[] = {
{
.start = GROUP_PIN(3,1),
.flags = IORESOURCE_IRQ,
.name = "100ask_led_pin",
},
{
.start = GROUP_PIN(5,8),
.flags = IORESOURCE_IRQ,
.name = "100ask_led_pin",
},
};

static struct platform_device board_A_led_dev = {
.name = "100ask_led",
.num_resources = ARRAY_SIZE(resources),
.resource = resources,
.dev = {
.release = led_dev_release,
},
};

static int __init led_dev_init(void)
{
int err;
err = platform_device_register(&board_A_led_dev);
return 0;
}

static void __exit led_dev_exit(void)
{
platform_device_unregister(&board_A_led_dev);
}

module_init(led_dev_init);
module_exit(led_dev_exit);
MODULE_LICENSE("GPL");

当模块安装时会调用led_dev_init,模块卸载时会调用led_dev_exit

注:必须要提供release函数,如果不提供则在调用platform_device_unregister时会出现警告:

1
2
3
WARN(1, KERN_ERR "Device '%s' does not have a release() "
"function, it is broken and must be fixed.\n",
dev_name(dev));

2.2.2 芯片层

chip_imx6ull_gpio.c

这一部分对应芯片层的硬件操作,和上一节一致:

1
2
3
4
5
6
7
8
9
10
11
12
static int board_demo_led_init (int which) /* 初始化LED, which-哪个LED */       
{
}

static int board_demo_led_ctl (int which, char status) /* 控制LED, which-哪个LED, status:1-亮,0-灭 */
{
}

static struct led_operations board_demo_led_opr = {
.init = board_demo_led_init,
.ctl = board_demo_led_ctl,
};

这一部分对应platform_driver配置和安装和卸载函数:

1
2
3
4
5
6
7
8
9
10
11
12
13
14
15
16
17
18
19
20
21
22
23
24
25
26
27
28
29
30
31
32
33
34
35
36
37
38
39
40
41
42
43
44
45
46
47
48
49
50
51
52
53
54
55
56
57
58
59
60
61
62
63
64
65
66
static int g_ledpins[100];
static int g_ledcnt = 0;
/* 当dev和drv匹配时调用,根据dev具体的硬件参数,来完成设备文件初始化等操作 */
static int chip_demo_gpio_probe(struct platform_device *pdev)
{
struct resource *res;
int i = 0;

while (1)
{
res = platform_get_resource(pdev, IORESOURCE_IRQ, i++);
if (!res) break;

g_ledpins[g_ledcnt] = res->start;
led_class_create_device(g_ledcnt); // 调用通用驱动层的函数,完成设备文件创建
g_ledcnt++;
}
return 0;
}

/* 当dev和drv解除匹配时调用 */
static int chip_demo_gpio_remove(struct platform_device *pdev)
{
struct resource *res;
int i = 0;

while (1)
{
res = platform_get_resource(pdev, IORESOURCE_IRQ, i);
if (!res) break;

led_class_destroy_device(i);
i++;
g_ledcnt--;
}
return 0;
}

static struct platform_driver chip_demo_gpio_driver = {
.probe = chip_demo_gpio_probe,
.remove = chip_demo_gpio_remove,
.driver = {
.name = "100ask_led",
},
};

/* 在模块安装时调用 */
static int __init chip_demo_gpio_drv_init(void)
{
int err;

err = platform_driver_register(&chip_demo_gpio_driver);
register_led_operations(&board_demo_led_opr);

return 0;
}

/* 在模块卸载时调用 */
static void __exit lchip_demo_gpio_drv_exit(void)
{
platform_driver_unregister(&chip_demo_gpio_driver);
}

module_init(chip_demo_gpio_drv_init);
module_exit(lchip_demo_gpio_drv_exit);
MODULE_LICENSE("GPL");

2.2.3 通用驱动层

1
2
3
4
5
6
7
8
9
10
11
12
13
14
15
16
17
18
19
20
21
22
static int major = 0;
static struct class *led_class;
struct led_operations *p_led_opr;

void led_class_create_device(int minor)
{
device_create(led_class, NULL, MKDEV(major, minor), NULL, "100ask_led%d", minor); /* /dev/100ask_led0,1,... */
}
void led_class_destroy_device(int minor)
{
device_destroy(led_class, MKDEV(major, minor));
}
void register_led_operations(struct led_operations *opr)
{
p_led_opr = opr;
}

EXPORT_SYMBOL(led_class_create_device);
EXPORT_SYMBOL(led_class_destroy_device);
EXPORT_SYMBOL(register_led_operations);

...

通用驱动层的代码和之前几乎一样,只不过设备文件的创建因为和硬件资源的分配有关,所以放到了芯片层完成。

EXPORT_SYMBOL():EXPORT_SYMBOL标签内定义的函数或者符号对全部内核代码公开,使用EXPORT_SYMBOL可以将一个函数以符号的方式导出给其他模块使用