1. 休眠与唤醒
1.1 使用示例
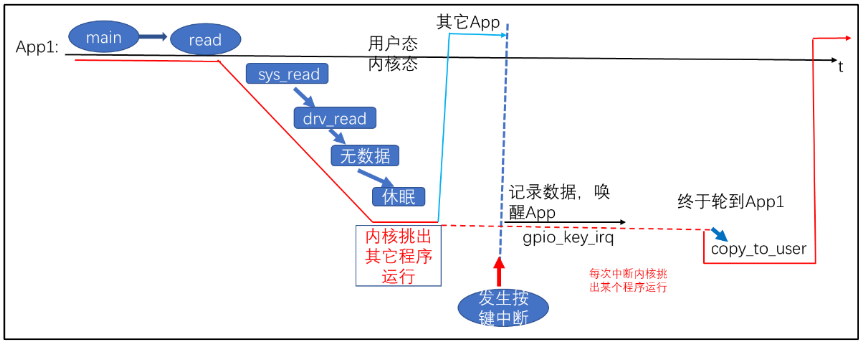
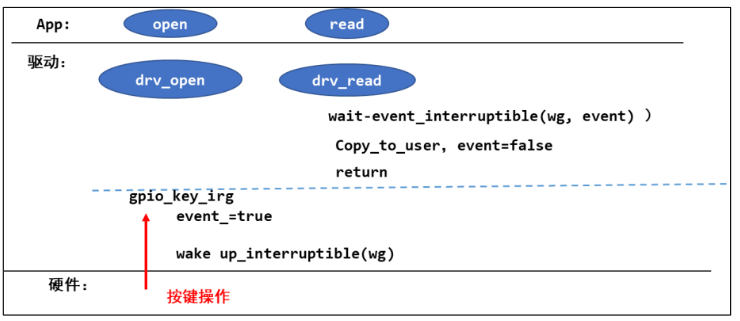
使用休眠-唤醒机制来编写按键驱动程序:
- APP 调用 read 等函数试图读取数据,比如读取按键;
- APP 进入内核态,也就是调用驱动中的对应函数,发现有数据则复制到用户空间并马上返回;
- 如果 APP 在内核态,也就是在驱动程序中发现没有数据,则 APP 休眠,进程/线程状态改为非 Running;
- 当有数据时,比如当按下按键时,驱动程序的中断服务程序被调用,它会记录数据、将 APP 的进程/线程状态修改为 Running;
- 调度器调度 APP 继续运行它的内核态代码,也就是驱动程序中的函数,复制数据到用户空间并马上返回。
如下图所示:
1.2 内核函数
参考内核源码:include\linux\wait.h
1.2.1 休眠函数
| 函数 | 说明 |
|---|---|
| wait_event_interruptible(wq, condition) | 休眠,直到 condition 为真; 休眠期间是可被打断的,可以被信号打断 |
| wait_event(wq, condition) | 休眠,直到 condition 为真; 退出的唯一条件是 condition 为真,信号也不好使 |
| wait_event_interruptible_timeout(wq, condition, timeout) | 休眠,直到 condition 为真或超时; 休眠期间是可被打断的,可以被信号打断 |
| wait_event_timeout(wq, condition, timeout) | 休眠,直到 condition 为真; 退出的唯一条件是 condition 为真,信号也不好使 |
wq 是指 waitqueue,等待队列,休眠时除了把程序状态改为非 RUNNING 之外,还要把进程/进程放入 wq 中,以后中断服务程序要从 wq 中把它取出来唤醒。声明等待队列头的源码如下:
1
2
3
4
5
6只需要调用宏
DECLARE_WAIT_QUEUE_HEAD就可以将一个变量修饰为等待队列头condition 可以是一个变量,也可以是任何表达式。表示“一直等待,直到 condition 为 TRUE ”。
1.2.2 唤醒函数
| 函数 | 说明 |
|---|---|
| wake_up_interruptible(x) | 唤醒 x 队列中状态为“TASK_INTERRUPTIBLE”的线程,只唤醒其中的一个线程 |
| wake_up_interruptible_nr(x, nr) | 唤醒 x 队列中状态为“TASK_INTERRUPTIBLE”的线程,只唤醒其中的 nr 个线程 |
| wake_up_interruptible_all(x) | 唤醒 x 队列中状态为“TASK_INTERRUPTIBLE”的线程,唤醒其中的所有线程 |
| wake_up(x) | 唤醒 x 队列中状态为 “ TASK_INTERRUPTIBLE ”或 “TASK_UNINTERRUPTIBLE”的线程,只唤醒其中的一个线程 |
| wake_up_nr(x, nr) | 唤醒 x 队列中状态为“TASK_INTERRUPTIBLE ”或 “TASK_UNINTERRUPTIBLE”的线程,只唤醒其中 nr 个线程 |
| wake_up_all(x) | 唤醒 x 队列中状态为 “ TASK_INTERRUPTIBLE ”或 “TASK_UNINTERRUPTIBLE”的线程,唤醒其中的所有线程 |
1.3 使用休眠-唤醒机制编写按键驱动
主要步骤如下图:
代码:
内核模块init/exit,platform_driver 的 probe/remove,中断的声明和注册,都和之前类似,主要代码是 file_operations 中的操作:
1 | static DECLARE_WAIT_QUEUE_HEAD(gpio_key_wait); // 声明等待队列头 |
代码中使用 put_key,get_key 等函数封装了循环队列,用以保存 APP 程序未运行时的按键数据。APP 程序仅需要打开设备文件之后,一直读取即可。
2. POLL 机制
2.1 使用示例
使用 POLL 机制来编写按键驱动程序:
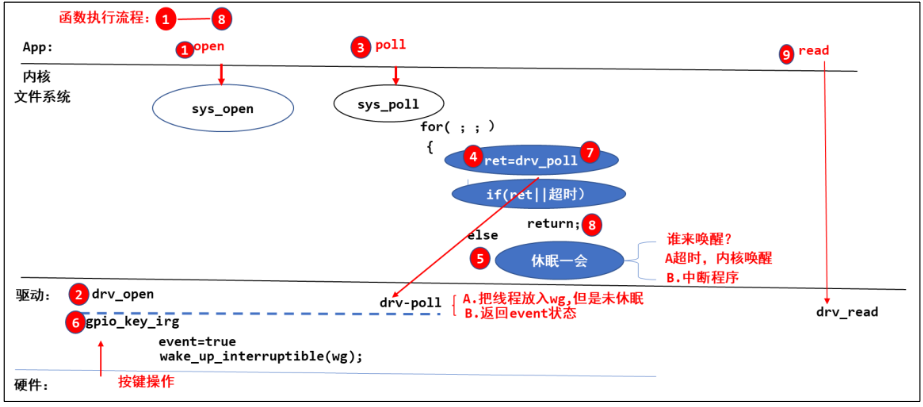
- APP 不知道驱动程序中是否有数据,可以先调用 poll 函数查询一下,poll 函数可以传入超时时间
- APP 进入内核态,调用驱动程序的 poll 函数,如果有数据则立刻返回;否则就休眠一段时间。
- 当有数据时,比如当按下按键时,驱动程序的中断服务程序被调用,它会记录数据、唤醒 APP;或者当超时时间到了之后,内核也会唤醒 APP
- APP 根据 poll 函数的返回值就可以知道是否有数据,如果有数据就调用 read 得到数据
如下图所示:
注意事项:
- 内核函数
sys_poll封装了实现 poll 机制的步骤,仅需要用户将线程放入等待队列,并返回判断条件 event 的状态即可 - 通过上图中
sys_poll的伪代码示例,用户提供的drv_poll可能会被调用两次,使用内核函数poll_wait把线程挂入队列,如果线程已经在队列里 了,它就不会再次挂入,避免重复挂入相同的线程。
2.2 应用编程
APP 可以调用 poll 或者 select 函数,这 2 个函数的作用是一致的。poll/select 函数可以监测多个文件,可以监测多种事件:
| 宏 | 值 | 描述 |
|---|---|---|
| POLLIN | 0x0001 | 表示可读数据,即文件描述符有数据可读 |
| POLLPRI | 0x0002 | 表示有紧急数据可读,通常用于表示带外(out-of-band)数据的到达 |
| POLLOUT | 0x0004 | 表示可写数据,即文件描述符可以接受写入数据 |
| POLLERR | 0x0008 | 表示发生错误,文件描述符处于错误状态 |
| POLLHUP | 0x0010 | 表示挂起,即文件描述符被挂起连接 |
| POLLNVAL | 0x0020 | 表示文件描述符非法,即未打开的文件描述符 |
| POLLRDNORM | 0x0040 | 等同于 POLLIN |
| POLLRDBAND | 0x0080 | Priority band data can be read,有优先级较较高的“band data”可读 |
| POLLWRNORM | 0x0100 | 等同于 POLLOUT |
| POLLWRBAND | 0x0200 | Priority data may be written |
系统调用:
1 |
|
返回值:
- 成功返回正数,表示就绪的文件描述符的数量,每个就绪的文件描述符的具体就绪事件则通过revents 字段来表示。内核中 poll 机制的实现主要是对所有传入文件调用驱动提供的 file_operations.poll 函数;循环调用一边之后,如果存在产生事件的文件则直接返回,否则进入休眠(APP 中可根据返回数量来循环检查是哪些文件产生相应事件);当超时时间到或者中断唤醒后进行第二轮循环调用。
- 返回0表示调用超时,并且没有准备好任何文件描述符。
- 出现错误时,返回 -1
events 表示请求的事件,revents 表示返回的事件:
1
2
3mask = f.file->f_op->poll(f.file, pwait);
/* Mask out unneeded events. */
mask &= pollfd->events | POLLERR | POLLHUP;内核中会将 file_operations.poll 函数返回的事件 mask 和请求的事件 events相与,
POLLERR | POLLHUP是两个严重事件,所以无论 APP有没有请求,只要这两个事件发生就一定会返回
主要代码:
1 | struct pollfd fds[1]; |
2.3 驱动编程
实现 poll 机制,只需要在 file_operations.poll 函数中做两件事情:
- 将线程放入等待队列(调用 poll_wait 函数可以自动将线程放入,并且不会重复放入)
- 返回正确的 POLL 事件 (事件列表如 2.2 节,如果没有任何事件发生,则返回 0 )
代码如下:
1 | static unsigned int gpio_key_drv_poll(struct file *fp, poll_table * wait) |
其余部分与 1.3 节中的代码一致。
注:(POLLIN | POLLRDNORM) 或 (POLLOUT | POLLWRNORM) 一般一起返回,之所以需要加上 POLLRDNORM 和 POLLWRNORM 是为了兼容某些 APP
3.异步通知
使用 POLL 机制来编写按键驱动程序:
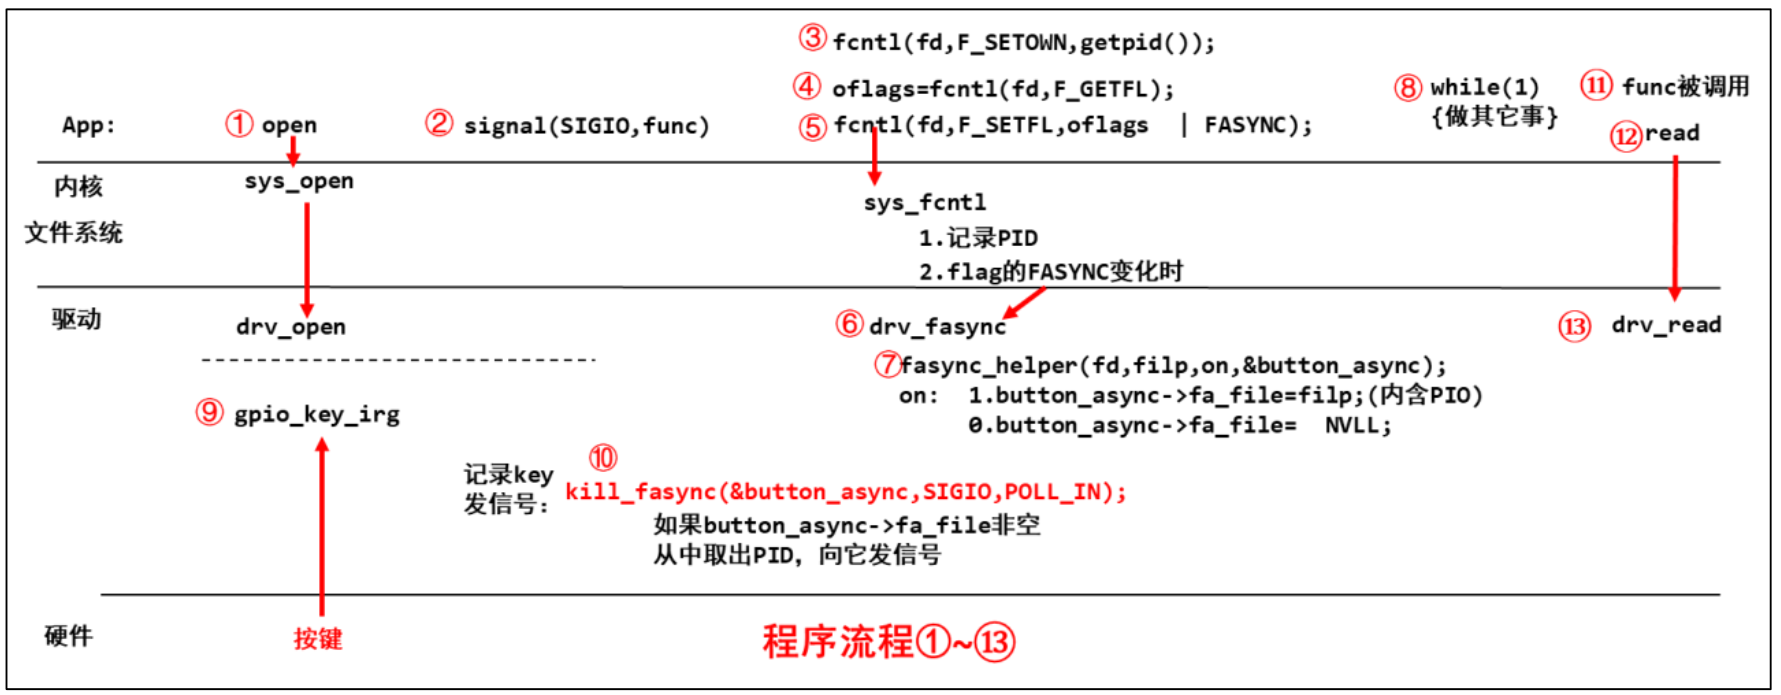
- APP 使用
signal函数注册信号量对应的处理函数,并打开自己的设备文件。 - APP 调用
fcntl将自己的进程号写入内核文件系统,然后调用fcntl为设备文件添加FASYNC标志位;此后,APP可以处理其他工作,直到收到驱动发送的信号。 - 驱动应提供
file_operations.fasync函数,当设备文件 Flag 内的FASYNC标志位变化时,会导致驱动程序的fasync函数被调用 faync函数需要调用内核函数faync_helper,它会根据FASYNC的值设置button_async->fa_file=filp or NULL,filp结构体中包含之前 APP 写入的进程号- 当触发按键中断之后,可以在中断中提供
kill_fasync函数发信号 - APP 收到信号之后,自动调用信号处理函数,可以在处理函数中调用 read 函数读取按键
如下图所示:
3.1 应用编程
系统调用-signal :
1 |
|
主要代码:
1 | // 信号处理函数 |
3.2 驱动编程
可参考 1.3 节,为了实现异步通知机制,仅需要提供file_operations.fasync函数,并在中断函数中调用 kill_fasync函数发送信号进行通知:
1 | struct fasync_struct *button_fasync; |
4.阻塞和非阻塞
APP 可以基于 POLL 机制进行休眠,也可以在调用 open 函数时传入 O_NONBLOCK 表示使用非阻塞模式打开文件(默认是阻塞方式)。POLL 机制的实现需要驱动程序支持,而以非阻塞方式打开文件,同样需要:
对于普通文件、块设备文件,O_NONBLOCK 不起作用。
对于字符设备文件,O_NONBLOCK 起作用的前提是驱动程序针对该标志位做了对应处理。
在内核的文件系统层会为设备文件创建一个 struct file 结构体,该结构体中的成员 f_flags 表示设备文件的标志,对于 APP 可以在 open 时以相应的标志打开文件,也可以通过 fcntl 函数来设置设备文件的标志位:
1 | fd = open(argv[1], O_RDWR | O_NONBLOCK); |
对于驱动程序可以通过判断 f_flags 是否含有 O_NONBLOCK 标志位,并进行相应操作:
1 | if (file->f_flags & O_NONBLOCK) |
4.1 应用程序
1 | fd = open(argv[1], O_RDWR | O_NONBLOCK); |
4.2 驱动程序
1 | static ssize_t gpio_key_drv_read (struct file *file, char __user *buf, size_t size, loff_t *offset) |
5.定时器
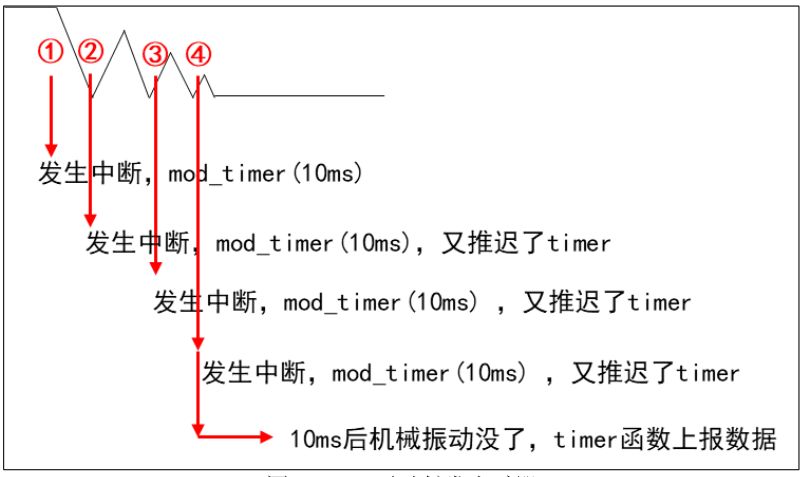
按键操作中存在机械抖动,如果硬件设计中没有电容去抖动的话,那么就需要我们在软件设计上延时一段时间来等待抖动过去,在按键稳定之后再读取电平。实现延时的选择自然就是定时器了。
5.1 定时器的内核函数
参考内核源码:include\linux\timer.h
设置定时器
1
2
3
4
5
6
7
8
9
10
11
12
13
14
15
16
17
18
19
20
21
22setup_timer(timer, fn, data)
void init_timer_key(struct timer_list *timer, unsigned int flags,
const char *name, struct lock_class_key *key)
{
debug_init(timer);
do_init_timer(timer, flags, name, key);
}设置定时器,主要是初始化 timer_list 结构体,设置其中的处理函数和传入参数,可将地址作为数据传入。
struct timer_list结构体内容如下:1
2
3
4
5
6
7
8
9
10
11struct timer_list {
/*
* All fields that change during normal runtime grouped to the
* same cacheline
*/
struct hlist_node entry;
unsigned long expires;
void (*function)(unsigned long);
unsigned long data;
u32 flags;
}向内核添加定时器
1
void add_timer(struct timer_list *timer)
调用之前需要设置超时时间 expires;当超时时间到达时,内核会调用函数
timer->function(timer->data)修改超时时间
1
int mod_timer(struct timer_list *timer, unsigned long expires)
等价于
del_timer(timer); timer->expires = expires; add_timer(timer);但更加高效;当修改一个非运行的定时器时返回 0 ,反之返回1
删除定时器
1
int del_timer(struct timer_list *timer)
5.2 定时器的时间单位
编译内核时,可以在内核源码根目录下用“ls -a”看到一个隐藏文件,它就是内核配置文件。打开后可以看到如下这项:
1 | CONFIG_HZ=100 |
这表示内核每秒中会发生 100 次系统滴答中断(tick),这就像人类的心跳一样,这是 Linux 系统的心跳。每发生一次 tick 中断,全局变量 jiffies 就会累加 1
因此,设置超时时间的方式:
1 | timer.expires = jiffies + xxx; // xxx 表示多少个滴答后超时,也就是 xxx*10ms |
5.3 使用定时器编写按键驱动
编程的思路,如下:
- 初始化定时器并设置超时时间为INF,然后添加定时器
- 当触发按键中断后,修改超时时间为当前时间的 10ms 后
- 当定时器软中断触发后,在读取稳定的电平,从而判断按键的状态
为了独立监测每一个按键,我们在按键结构体中为每一个按键都分配一个 struct timer_list:
1 | struct gpio_key{ |
在 probe 函数中初始化每一个按键的定时器,在 remove 函数中删除定时器:
1 | setup_timer(&gpio_keys_100ask[i].key_timer, key_timer_expire, &gpio_keys_100ask[i]); |
在按键中断处理函数中,修改定时器的超时时间:
1 | static irqreturn_t gpio_key_isr(int irq, void *dev_id) |
在定时器软中断处理函数中,读取电平:
1 | static void key_timer_expire(unsigned long data) |
6.中断下半部 tasklet
使用软中断 tasklet 实现中断下半部的方式通常用来处理相对不复杂的任务(复杂耗时的会使用工作队列线程化的处理),tasklet 的具体实现机制参见“异常和中断”的第 2.1.3 节。
6.1 tasklet 的内核函数
参见内核源码:include\linux\interrupt.h
中断下半部使用结构体 tasklet_struct 来表示:
1 | struct tasklet_struct |
state 有两位:
bit0 表示 TASKLET_STATE_SCHED:
等于 1 时表示已经执行了 tasklet_schedule 已经把该 tasklet 放入队列了。
tasklet_schedule 会判断该位,如果已经等于 1 那么它就不会再次把 tasklet 放入队列。
bit1 表示 TASKLET_STATE_RUN:
等于 1 时,表示正在运行 tasklet 中的 func 函数;函数执行完后内核会把该位清 0。
其中的 count 表示该 tasklet 是否使能:等于 0 表示使能了,非 0 表示被禁止了。对于 count 非 0 的 tasklet,里面的 func 函数不会被执行。
定义结构体 tasklet_struct
1
2
3
4
5
6
7
extern void tasklet_init(struct tasklet_struct *t, void (*func)(unsigned long), unsigned long data);- 使用 DECLARE_TASKLET 定义的 tasklet 结构体,它是使能的
- 使用 DECLARE_TASKLET_DISABLED 定义的 tasklet 结构体,它是禁止的;使用之前要先调用 tasklet_enable 使能它
- 使用 tasklet_init 定义的结构体也是使能的
使能/失能 tasklet
1
2static inline void tasklet_enable(struct tasklet_struct *t);
static inline void tasklet_disable(struct tasklet_struct *t);- tasklet_enable 把 count 减 1
- tasklet_disable 把 count 加 1
调度 tasklet
1
static inline void tasklet_schedule(struct tasklet_struct *t);
- 把 tasklet 放入链表,并且设置它的 TASKLET_STATE_SCHED 状态为 1。
kill tasklet
1
extern void tasklet_kill(struct tasklet_struct *t);
- 如果一个 tasklet 已被放入链表且未被调度,则 tasklet_kill 会将它的 TASKLET_STATE_SCHED 状态清 0
- 如果一个 tasklet 已被调度,tasklet_kill 会等待它执行完华,再它的 TASKLET_STATE_SCHED 状态清 0
6.2 为驱动程序添加 tasklet
在按键驱动中,并没有多少复杂耗时的操作,不过我们可以象征性的将一些操作放入到 tasklet 的处理函数中。
在 probe 函数中初始化每一个按键的 tasklet 结构体,在 remove 函数中 kill 掉 tasklet 结构体:
1 | tasklet_init(&gpio_keys_100ask[i].tasklet, key_tasklet_func, &gpio_keys_100ask[i]); |
在按键中断结束时,调度 tasklet:
1 | static irqreturn_t gpio_key_isr(int irq, void *dev_id) |
tasklet 的处理函数:
1 | static void key_tasklet_func(unsigned long data) |
7. 工作队列
前面讲的定时器、下半部 tasklet 都属于软中断,都是在中断上下文中执行的,无法休眠。这些更耗时的工作放在定时器或是下半部中,会使得系统很卡,因此可以使用线程来处理这些耗时的工作,从而解决系统卡顿的问题,因为线程可以休眠。
对于耗时而不是非常耗时的逻辑,我们并不需要自己去创建线程,可以使用“工作队列” (workqueue)。我们只需要将“工作”放入“工作队列”中,当对应的内核线程被调度时就会取出“工作”,执行处理函数。
在多 CPU 的系统下,一个工作队列可以有多个内核线程,可以在一定程度上 缓解这个问题。
缺点:多个工作是在某个内核线程中依次执行的,前面的工作执行很慢,会使得后面的工作不能及时响应。所以对于非常复杂耗时的工作,可以为其单独开一个线程。
7.1 工作队列的内核函数
参考内核源码:include\linux\workqueue.h
work_struct 结构体的定义如下:
1 | struct work_struct { |
定义 work
1
2
3
4
5- 第 1 个宏是用来定义一个 work_struct 结构体,要指定它的函数
- 第 2 个宏用来定义一个 delayed_work 结构体,也要指定它的函数。区别在于要让它运行时,可以指定某段时间之后再执行。
上面用来直接声明工作队列结构体,如果想要在代码中初始化 work_struct 结构体,可以使用:
1
#define INIT_WORK(_work, _func)
使用 work
1
2
3
4static inline bool schedule_work(struct work_struct *work)
{
return queue_work(system_wq, work);
}调用 schedule_work 时,就会把 work_struct 结构体放入队列中,并唤醒对应的内核线程。内核线程就会从队列里把 work_struct 结构体取出来,执行里面的函数
返回 false 表示 work 已经在工作队列中,否则返回 true
其他函数
函数 说明 create_workqueue 在 Linux 系统中已经有了现成的 system_wq等工作队列, 你当然也可以自己调用 create_workqueue 创建工作队列; 对于 SMP 系统,这个工作队列会有多个内核线程与它对应,创建工作队列时,内核会帮这个工作队列创建多个内核线程create_singlethread_workqueue 如果想只有一个内核线程与工作队列对应, 可以用本函数创建工作队列, 创建工作队列时,内核会帮这个工作队列创建一个内核线程 destroy_workqueue 销毁工作队列 schedule_work 调度执行一个具体的 work,执行的 work 将会被挂入 Linux 系统提供的工作队列 schedule_delayed_work 延迟一定时间去执行一个具体的任务,功能与 schedule_work 类似,多了一个延迟时间 queue_work 跟 schedule_work 类似,schedule_work 是在系统默认的工作队列上执行一个 work, queue_work 需要自己指定工作队列 queue_delayed_work 跟 schedule_delayed_work 类似,schedule_delayed_work 是在系统默认的工作队列上执行一个 work,queue_delayed_work 需要自己指定工作队列 flush_work 等待一个 work 执行完毕,如果这个 work 已经被放入队列,那么本函数等它执行完毕,并且返回 true; 如果这个 work 已经执行完毕才调用本函数,那么直接返回 false flush_delayed_work 等待一个 delayed_work 执行完毕,如果这个 delayed_work 已经被放入队列,那么本函数等它执行完毕,并且返回 true; 如果这个 delayed_work 已经执行完毕才调用本函数,那 么直接返回 false
7.2 为驱动程序添加工作队列
在按键驱动中,并没有多少复杂耗时的操作,不过我们可以象征性的将一些操作放入到工作队列的处理函数中。
在 probe 函数中初始化每一个按键的 work_struct 结构体:
1 | INIT_WORK(&gpio_keys_100ask[i].work, key_work_func); |
在按键中断结束时,调度 work:
1 | static irqreturn_t gpio_key_isr(int irq, void *dev_id) |
work 的处理函数:
1 |
|
8.中断的线程化处理
复杂、耗时的事情,尽量使用内核线程来处理。中断的处理仍然可以认为分为上半部、下半部。上半部用来处理紧急的事情,下半部用一个内核线程来处理。
8.1 使用内核线程实现中断下半部
在按键驱动中,并没有多少复杂耗时的操作,不过我们可以象征性的将一些操作放入到工作队列的处理函数中。
在 probe 函数中注册使用内核线程实现下半部的中断,并在 remove 函数中释放:
1 | err = request_threaded_irq(gpio_keys_100ask[i].irq, gpio_key_isr, gpio_key_thread_func, IRQF_TRIGGER_RISING | IRQF_TRIGGER_FALLING, "100ask_gpio_key", &gpio_keys_100ask[i]); |
中断上半部和下半部的代码:
1 | static irqreturn_t gpio_key_isr(int irq, void *dev_id) |
8.2 内核线程的机制
在 request_threaded_irq 函数中,肯定会创建一个内核线程,以下为关键代码:
1 | int request_threaded_irq(unsigned int irq, irq_handler_t handler, |
在该函数中分配了一个 irqaction 结构体,并在 __setup_irq 函数中进一步处理,截取重要代码如下:
1 | static int |
如果 thread_fn 不为空,则调用 setup_irq_thread 函数来创建一个内核线程,截取代码如下:
1 | static int |
最后将创建的内核线程付给 thread 成员
再来分析中断的执行中是如何唤醒上面创建的内核线程的,并执行 thread_fn 函数的。
在 kernel\irq\handle.c 中,截取部分代码如下:
1 | irqreturn_t __handle_irq_event_percpu(struct irq_desc *desc, unsigned int *flags) |
thread 线程的处理函数为 irq_thread,在 kernel\irq\handle.c 中:
1 | static int irq_thread(void *data) |
整体流程如下图:
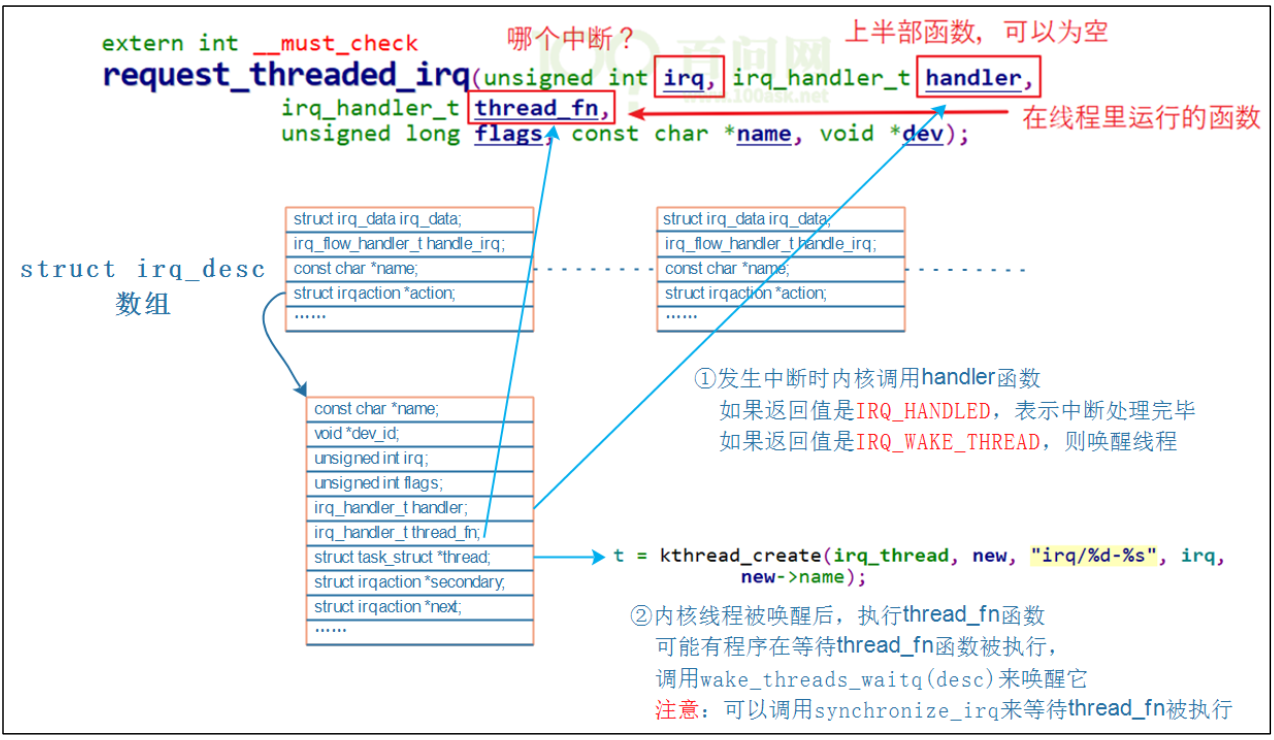
可能由程序在等待 thread_fn 函数被执行,irq_thread 函数最后会调用 wake_threads_waitq 唤醒:
1 | static void wake_threads_waitq(struct irq_desc *desc) |
wait_for_threads 是 wait_queue_head_t 类型,等待队列头内都是休眠的线程。
可以调用 synchronize_irq 来等待 thread_fn 被执行,synchronize_irq 的定义如下:
1 | /** |